The Purchase Order Screen
Every purchase order you've ever created lives on one screen: the Purchase Orders viewer. It's your ordering command center — where you find an order, check its status, see what you owe, open one up to edit or receive, and get to the settings that control how ordering behaves. If you order inventory through TORO, this is a screen worth knowing well.
Getting There
Open the Dashboard, click the Purchasing tab on the left, and click the View All Purchase Orders card. (Can't find it? Type "purchase order" in the search box at the top right.) You can also reach it from the Manager menu on the main screen. It opens with your current year's orders already loaded.
Reading the List
The main table shows one row per purchase order, with columns for Status, Date Received, the PO number (its ID), the Company (vendor) name, the Total, and who Verified it. The status cell is color-coded so you can scan the whole list and see where everything stands at a glance.
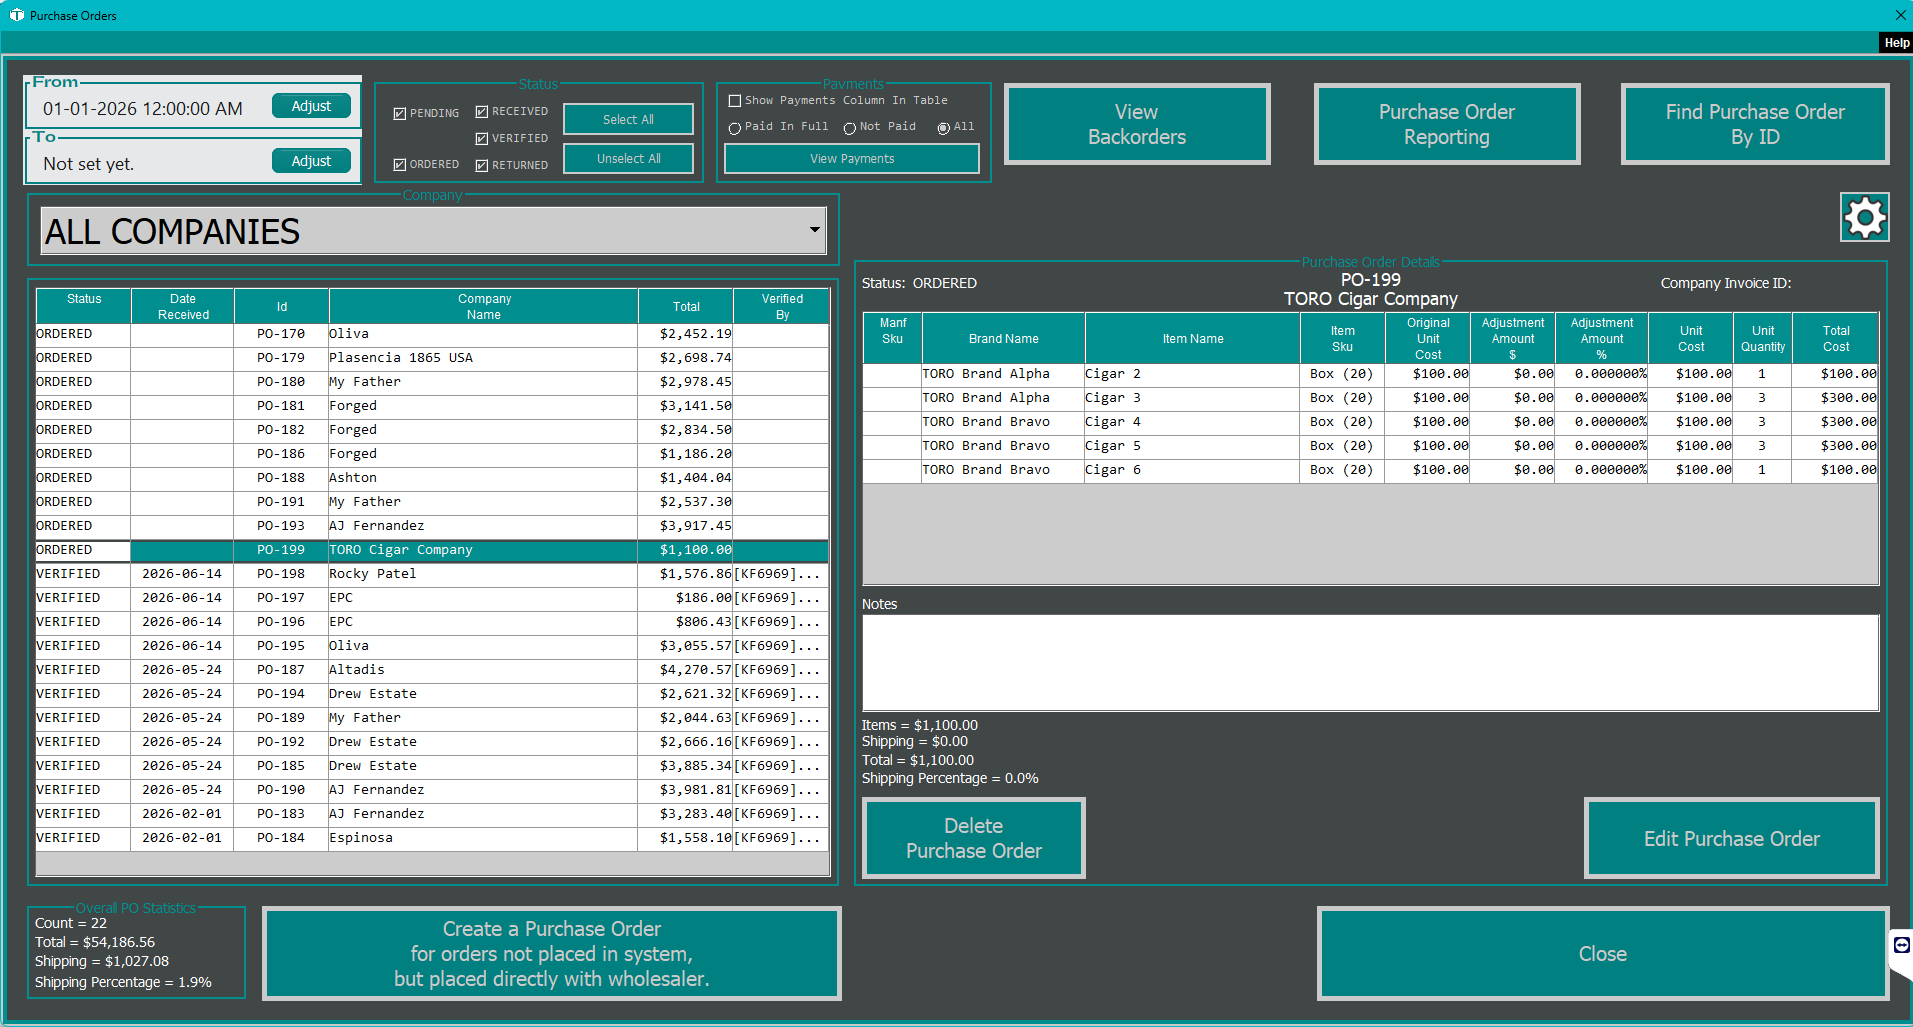
Select any order and the right-hand Purchase Order Details panel fills in — the vendor, the status, the vendor's invoice ID, every line item, the notes, and the money broken out into Items, Shipping, Total, and a Shipping Percentage. Double-click a row (or use Edit Purchase Order) to open the full editor.
The Status of a Purchase Order
A purchase order moves through a clear lifecycle, and the viewer lets you filter by each stage:
| Status | What it means |
|---|---|
| Pending | You're still building it. Not sent to the vendor yet. |
| Ordered | It's been sent to your rep / placed with the vendor. |
| Received | The shipment arrived and you confirmed it into inventory. Your on-hand counts went up. |
| Verified | You scanned and reconciled it against the invoice. This is the final, locked state. |
| Returned | A return to the vendor (tracked alongside your orders). |
Understanding this lifecycle is most of understanding purchase orders. Each step is covered in depth in Creating a Purchase Order, Receiving Inventory, and Verifying a Received Purchase Order.
Filtering to What You Need
Down the left side are the controls that narrow the list:
- From / To dates — the date window. It defaults to the start of the current year; change either date and the list reloads.
- Company — a dropdown that starts with All Companies and then lists each vendor. Pick one to see only that vendor's orders.
- Status checkboxes — Pending, Ordered, Received, Verified, Returned, with Select All / Unselect All buttons. Show only the stages you care about. (You'll only see the status boxes your permissions allow — see the note at the end.)
The Money View: Payments
The Payments panel lets you track what you've actually paid your vendors:
- Show Payments Column In Table adds a Paid column to the list so you can see paid vs. unpaid at a glance. (TORO remembers this choice.)
- The Paid In Full / Not Paid / All radio buttons filter by payment state.
- View Payments opens the payment records.
To record or edit a payment on a specific order, open it in the editor and use View/Add Payments there.
The Tools Across the Top
- Find Purchase Order By ID — jump straight to an order by its PO number.
- View Backorders — for the selected vendor, see everything carried over from past orders and waiting to be pulled onto a new one.
- Purchase Order Reporting — build a purchasing report for a date range and vendor scope, with an option to break out shipping.
- The gear / Settings button (top-right corner, an icon with no label) — opens the Purchase Order Settings. This is where the email text and CC contacts live, and it's the only place to turn rolling inventory on or off. More on that below.
Acting on an Order
With an order selected, the detail panel gives you:
- Edit Purchase Order — open it in the full editor.
- Delete Purchase Order — remove it. If the order was already received or verified, TORO warns you first, because deleting it affects your inventory counts.
- Duplicate Purchase Order — start a brand-new order from this one. See below.
- Mark Verified — appears when the selected order is Received. It opens the scan-and-reconcile window (Verifying a Received Purchase Order).
Re-ordering the Same Thing: Duplicate Purchase Order
If you buy roughly the same list from a vendor every month, you don't have to rebuild it item by item. Highlight the old order, click Duplicate Purchase Order, and TORO asks one question first — which costs should the copy use?
- Use The Same Costs — every item keeps the exact cost it had on the original order. Best when your pricing with that vendor hasn't moved.
- Use Today's Costs — every item is re-priced from its current cost in your item file, with that vendor's pricing agreement applied on top. Best when costs have drifted since the last order.
The copy opens as a fresh Pending order for the same vendor, with the same items and quantities, ready for you to adjust. Two things worth knowing:
- Nothing is saved until you click Save. If you change your mind, just close the window — no order is created and nothing is affected.
- Shipping, discount, and tax lines are not copied. Those belonged to the original invoice; you'll add this order's freight and terms when the new invoice arrives.
A note is added to the new order recording which order it came from, who duplicated it, and which costs were used — so months later it's obvious where it came from.
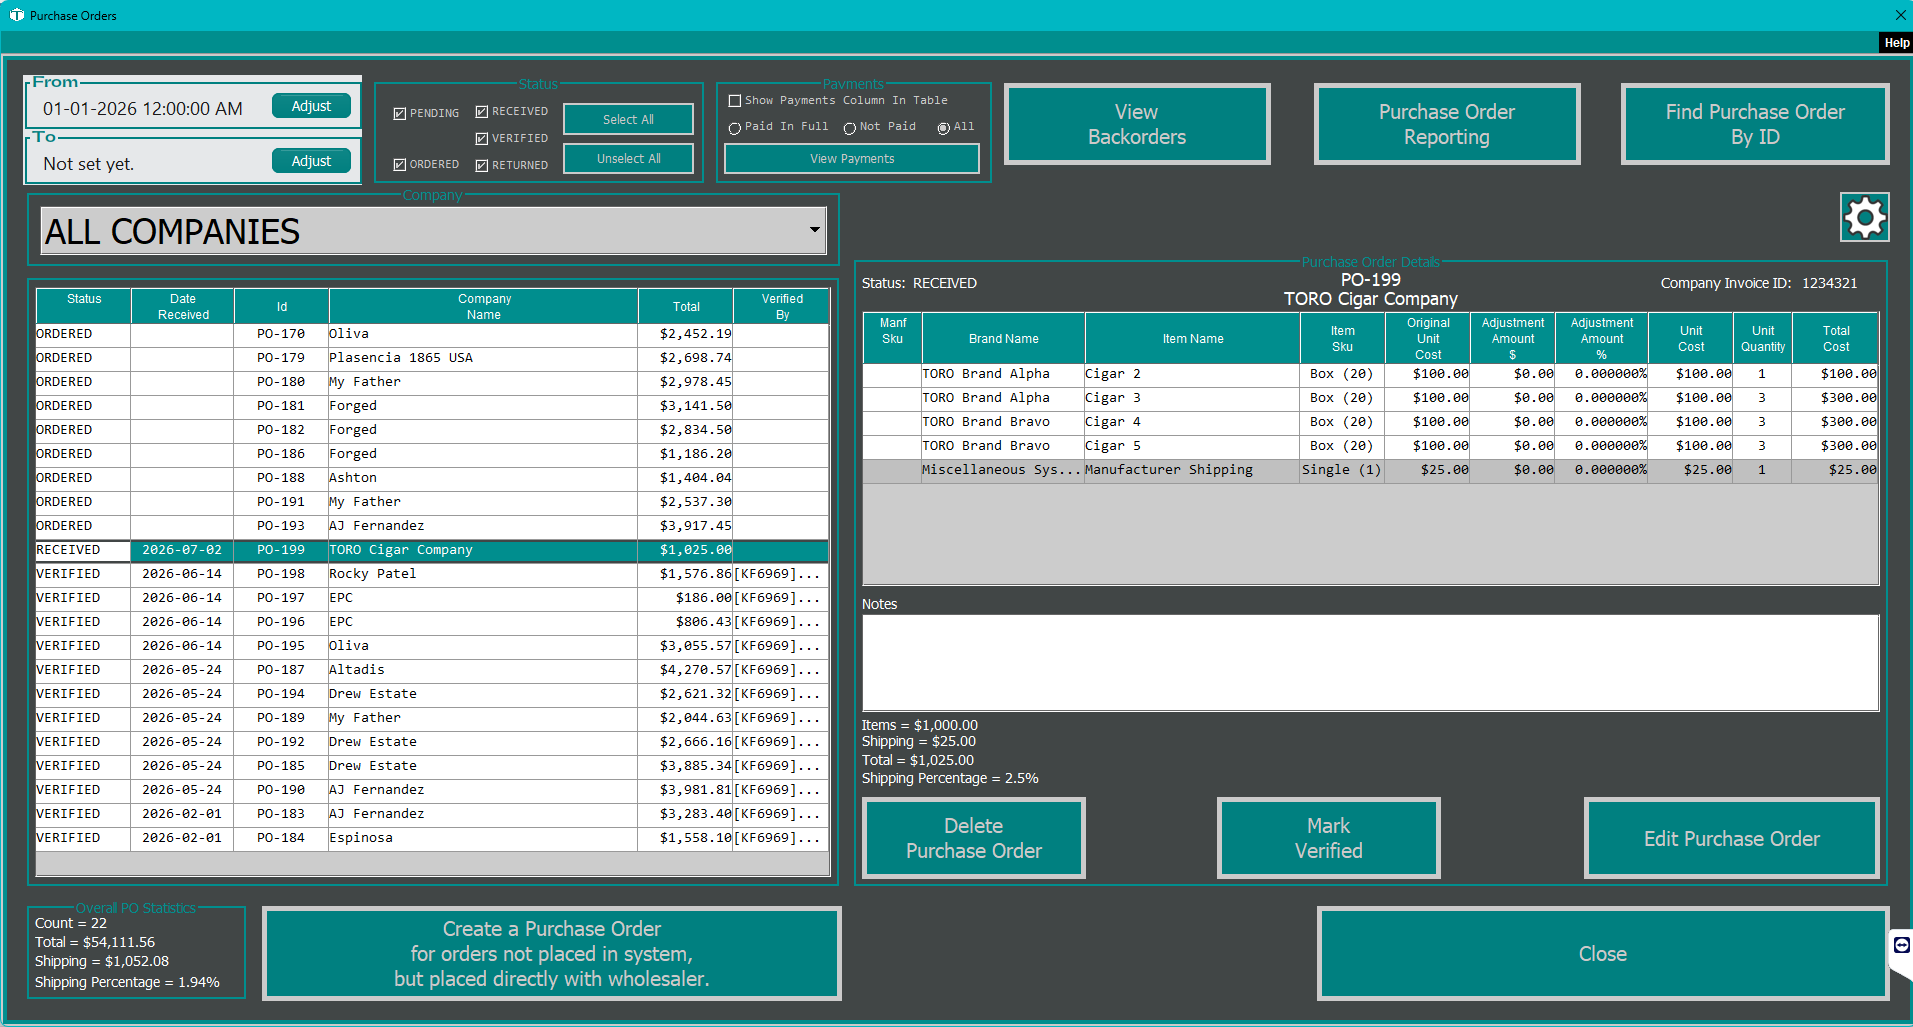
At the bottom left, an Overall PO Statistics panel totals up everything currently listed — count, total, shipping, and shipping percentage — a quick pulse on your ordering for the window you're viewing. And there's a large button for the common case of an order you placed directly with a wholesaler (by phone, at a show) that was never built in TORO: it opens a fresh, blank purchase order so you can record it after the fact.
Purchase Order Settings
Click the gear button and you'll find the settings that shape how orders go out and behave:
- Ask about rolling inventory when receiving a Purchase Order — the on/off switch for rolling inventory. This is worth its own read: Rolling Inventory.
- Text to add to the top / end of Purchase Orders — boilerplate that gets added to the emails you send vendors (a greeting, your terms, a sign-off).
- When sending Purchase Orders, also send to these contacts — extra people to CC on every order. TORO strongly recommends adding at least one in-store address here, so when a rep hits "Reply to All," someone at your shop gets the reply.
- Purchase Orders are sent from — the email account orders go out from, with a Change button to reconfigure it.
A Note on Who Sees What
The Purchase Orders screen respects your store's permissions. Depending on a staff member's access level, some status filters or the Mark Verified ability may be hidden. If someone can't see or do something described here, it's almost always a permissions setting, not a bug — see Access Levels and Permissions.