Access Levels and Permissions
Not every employee should have access to everything. Your cashier doesn't need to edit other people's timecards, and your new hire probably shouldn't be voiding $200 transactions on their second day. TORO's access system handles all of this — and when someone does need access they don't have, there's a built-in workflow to handle it without grinding your day to a halt.
How Access Levels Work
Every employee is assigned an access level — Admin, Manager, Cashier, or whatever custom levels you've created for your store. Each level comes with a set of permissions that control what that person can do. When someone tries to do something their level doesn't allow, TORO steps in with an Access Denied screen.
The system is designed around a simple principle: give people only the permissions they need. You can always grant more access later — it's much harder to undo damage from too much access up front.
Common access levels:
Admin — Full access to everything. System settings, employee management, reporting, overrides. This is the store owner and anyone they trust completely.
Manager — Operational access including reporting, overrides, higher discount limits, and void authority.
Cashier / Employee — Day-to-day operations: ringing sales, processing payments, clocking in and out, handling basic returns.
You can create as many custom levels as you need. Some stores have a "Shift Lead" level that's between Cashier and Manager, or a "Business Partner" level for co-owners.
The Access Denied Screen
When an employee tries to do something they don't have permission for, they'll see a screen that says "Sorry [name]! Your access level cannot perform this task." It also shows details about what was blocked — the access level, group name, function name, and an error ID.
From this screen, there are two main paths:
Get Permanent Access
This is for when someone's role has genuinely changed and they need ongoing access to something. Maybe you promoted a cashier, or you realized your managers need a permission you didn't originally give them.
When you click Get Permanent Access, TORO asks one question: "Is an ADMIN Level user available?"
If an admin is right there — they log in with their PIN, and the access is granted immediately. Done. The system generates an access key (something like "CIGAR-829" or "SKY-386") for the audit trail, and the permission is added to that employee's entire access level. That means everyone at that same level gets the permission too — which is usually what you want, since people at the same level should have the same capabilities.
If no admin is around — the employee types in why they need the access, and TORO sends a message with the details and an access key to the users set up in TORO Messages to receive access requests. The admin can process it remotely, or the employee can enter the key later through the Employee menu. Either way, nothing falls through the cracks.
A few things to know about permanent access:
Granting access to one person grants it to everyone at that access level. The access request message lists exactly who will gain the permission, so there are no surprises.
TORO detects duplicate requests. If someone already asked for the same permission and it hasn't been processed yet, it'll ask if you want to send a reminder instead of creating a new request.
Every request is logged with who asked, why, when, who approved it, and any notes the admin added.
Get Temporary Access
This is for one-off situations. The employee needs to do something right now, but it's not something they should permanently have access to.
Click Get Temporary Access and you'll see two options:
Request Temporary Access Code — The employee enters their PIN and explains why they need the access. TORO generates a temporary code and texts it to all admin users. If the employee has permission to receive the code immediately, it prints right on the receipt printer — no phone call needed. Otherwise, they need to check with an admin user for the code.
Use Temporary Access Code — Enter the temporary code at the PIN prompt to continue. If an admin user is nearby, they can enter their own PIN here instead and the action proceeds under their authorization. Think of it like a manager override at any other register system — the manager walks over, enters their code, and the employee can continue.
The key difference from permanent access: temporary access doesn't change anyone's permissions. The employee still won't have access to that function next time. It's a one-and-done override.
Processing Access Requests
If you're an admin, you'll occasionally need to process access requests that came in while you weren't at the register. Here's how:
Open the Dashboard, click the TORO Configuration tab, click the Set Up System card, then click Set Up Access
Click Process Access Requests. You'll see a list of requests with details: who asked, what they need, when they asked, and their reason
Use the Unprocessed Access Requests, Accepted Access Requests, and Rejected Access Requests checkboxes to choose which requests to show, or type in the Search box
Select one or more requests and click Grant Selected Requests or Reject Selected Requests. To work on a single request, select it and click Process Access Request (or double-click it).
Add notes when asked — they're saved with the request for future reference
You can also process a request by entering the access key directly. If someone texts you a key like "OCEAN-412", choose Process Access Request from the Employee menu, type the key in the Access Key box, click Search, then click Grant Access or Reject Access.
Color coding makes it easy to scan: Green rows are granted, Red rows are rejected, and unprocessed requests have no highlight.
Access Keys
Access keys are the human-readable codes TORO generates for tracking access requests. They look like STORM-847 or LIME-263 — a word plus three numbers. They're designed to be easy to read over the phone or text message.
Each key is unique and tied to a specific permission request. When someone gives you an access key, you know exactly what permission they're asking for — there's no ambiguity.
You'll encounter access keys in two places:
Text messages from TORO when an employee requests access while you're away
The Process Access Request screen where you can search by key
The Cancel Notification
Here's something worth knowing: if an employee hits Cancel on the Access Denied screen without requesting access, TORO sends a notification to the users set up in TORO Messages to receive access attempts. The message says "ACCESS ATTEMPT" and includes who tried, what they tried to access, and their access level.
This isn't about catching people doing something wrong. It's about visibility. If your cashier keeps hitting a wall trying to apply discounts, maybe it's time to add that permission to the Cashier level. You can't fix what you don't know about.
Setting Up Access Levels
To create or modify access levels:
Open the Dashboard, click the TORO Configuration tab on the left, and click the Set Up System card (you'll only see it if you're an admin)
Click the Set Up Access button, which opens the access levels screen
You can create new levels, rename existing ones, and assign specific functions to each level
Each access level has a list of allowed functions. When you add a function to a level, every employee at that level gains the permission immediately — no need to update individual accounts.
When you're setting up a new store, start with the defaults and adjust as you go. It's better to start restrictive and open things up than to start wide open and try to lock things down later.
Window-by-Window Tools
Most TORO windows have a few access tools of their own, for checking or changing what a role can do in that one window. To find them:
- In a window with a teal title bar, click the padlock, the first of the buttons in the top-right corner (just left of the ?).
- In an older-style window, open the Help menu at the top right.
- For the main sales screen itself, tap Config in the left sidebar, then Access.
What you see depends on the window and on who's signed in. The padlock menu ends with Lock Screen, which locks the window so nobody can see it while you step away.
Request Access to Window Functions
This is for employees. It lists the extra things this window can do (each one is an "access function") and whether your access level is allowed each one. Click a row to read its name and description. If you're not allowed, click Request Access and you'll go through the same Access Denied screen described above, so you can ask for permanent access or use a temporary code.
Once access is granted, close and reopen the window to use it. If you requested it from the main screen's Config > Access menu, TORO asks you to restart TORO instead.
Admins don't need this, since they already have access to everything.
Manage Accesses for Window
This one is for admins, and it only shows for an admin. (On the main screen's Config > Access menu it's called Adjust Accesses for Window, and if someone who isn't an admin signs in for it, TORO says "Only an admin can adjust the accesses for a window.") It opens Access Levels for Window, a grid with one row for each function in this window and one column for each of your access levels.
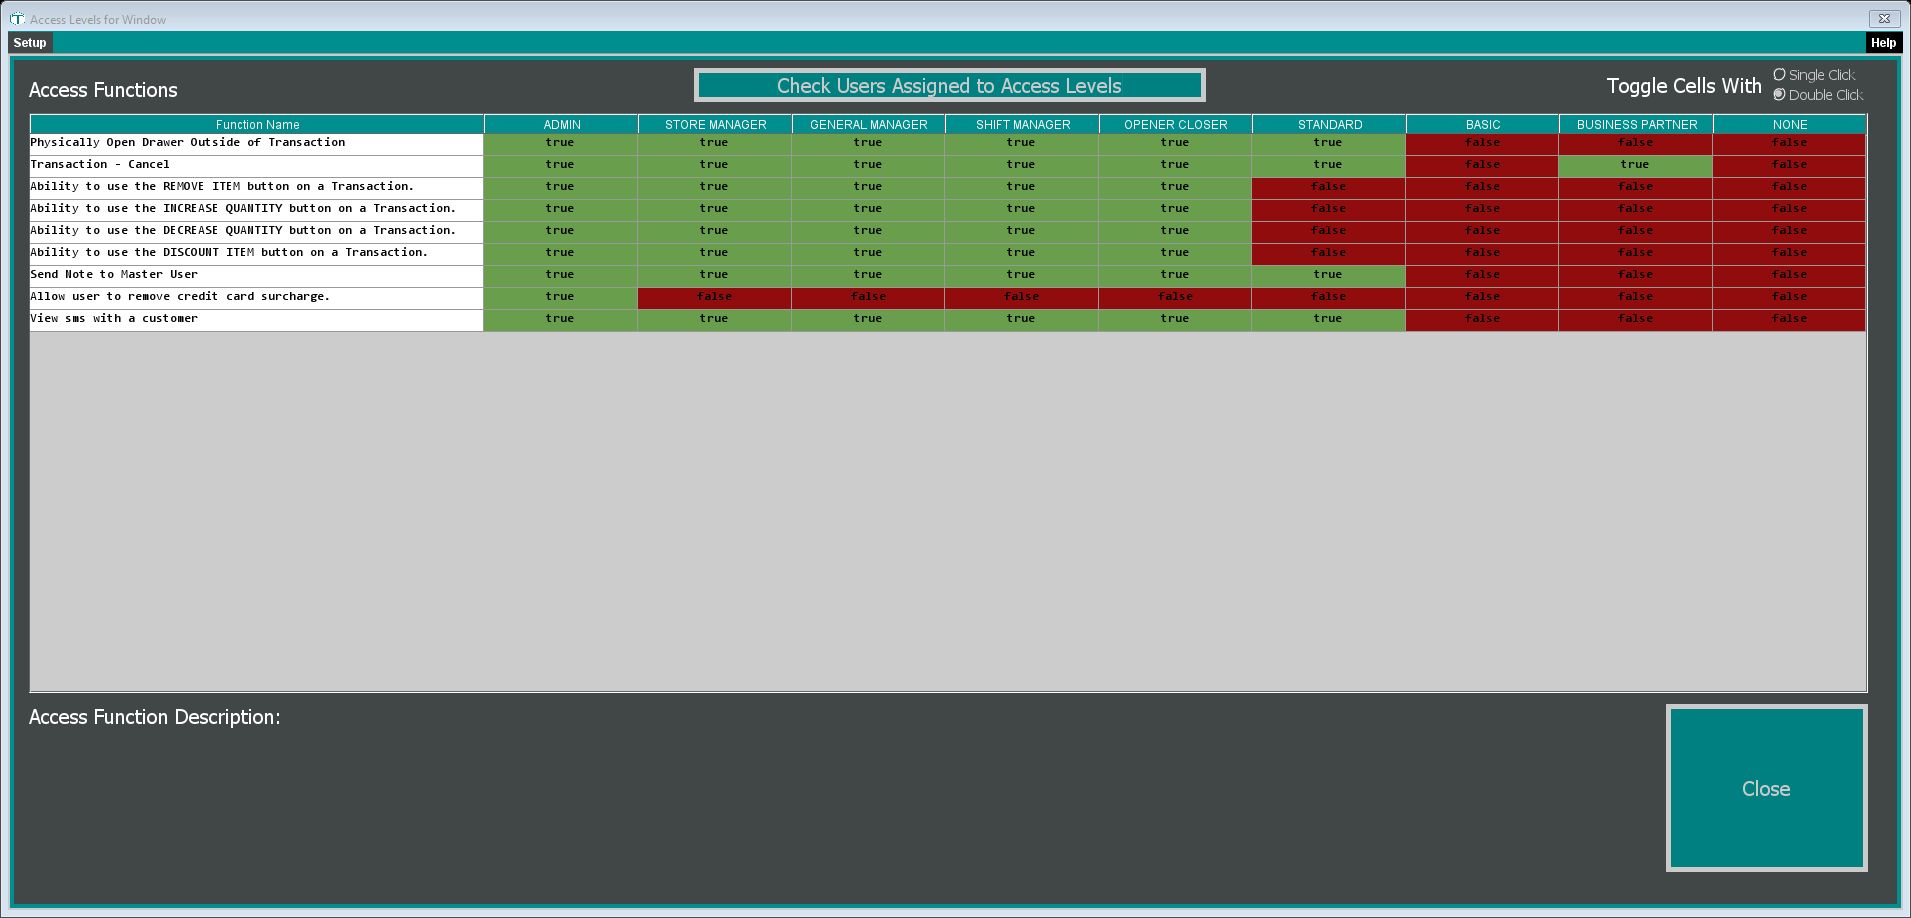
- A green true cell means that level is allowed; a red false means it isn't.
- Double-click a cell to switch it. To switch cells with a single click instead, pick Single Click at the top right (Double Click is picked when the window opens). The change saves straight away and applies to everyone at that level.
- Click a row to read what that function does in the Access Function Description box at the bottom.
- Check Users Assigned to Access Levels (or Setup > Manage Access Levels) opens the same access levels screen as Set Up Access (above), including which users are at each level.
It's the quickest way to answer "why can my shift managers cancel a sale but my cashiers can't?" without hunting through the full list. A change takes effect on this register straight away, and on your other registers the next time TORO is restarted on them.
Your Preferences for a Window
A few windows remember personal preferences, such as how the Item Catalog loads when you open it. Those windows have a person button in the top-right corner, between the ? and the X (in an older-style window, it's Adjust User Preferences for Window on the Help menu). It opens Preferences for This Window for whoever is signed in, showing just the preferences that belong to that window.
Each preference is its own card, with its name, what it does, and the control to change it: an On checkbox, a number box (TORO tells you the allowed range if you go outside it), or a drop-down list. Make your changes and click Save, or Cancel to leave everything as it was. Preferences belong to each employee, so changing yours doesn't change anyone else's.
Repair Window Access Security
This one is only on the main screen's Config > Access menu. It refreshes your store's list of access functions from TORO. There's no message when it finishes; the cursor just goes back to normal. You'd normally only use it when TORO support asks you to.
Tips for Managing Access
Review access attempts periodically. The notifications you get when employees hit the Access Denied screen are valuable data. If the same permission keeps getting requested, it probably belongs in that access level permanently.
Use the right path for the situation. Temporary access for one-off needs, permanent access for role changes. Don't keep granting temporary access for something someone needs every day — just add it to their level.
Keep your access levels clean. A few well-defined levels are better than dozens of custom ones. Most stores do fine with Admin, Manager, and Cashier (maybe Shift Lead too).
Don't share PINs. Every override, every access request, every action is tracked by PIN. If two people share a PIN, you lose accountability. The whole system depends on knowing exactly who did what.