Tagging Items
Tags are labels you make up yourself and stick on items: "Rare," "Staff Picks," "Holiday Gift Ideas," "No Box Discount." An item can carry as many tags as you like, and a tag can sit on as many items as you like. Once a group of items shares a tag, other parts of TORO can work with that group in one go.
The Bulk Tag Applier is where you create your tags and put them on items, a whole group at a time.
Finding It
Open the Dashboard
Click the Items tab on the left, then click the Tag Items card. (Can't find it? Type "tag" in the search box at the top right.)
The View Tags card on the same tab opens the exact same window, so use whichever you spot first.
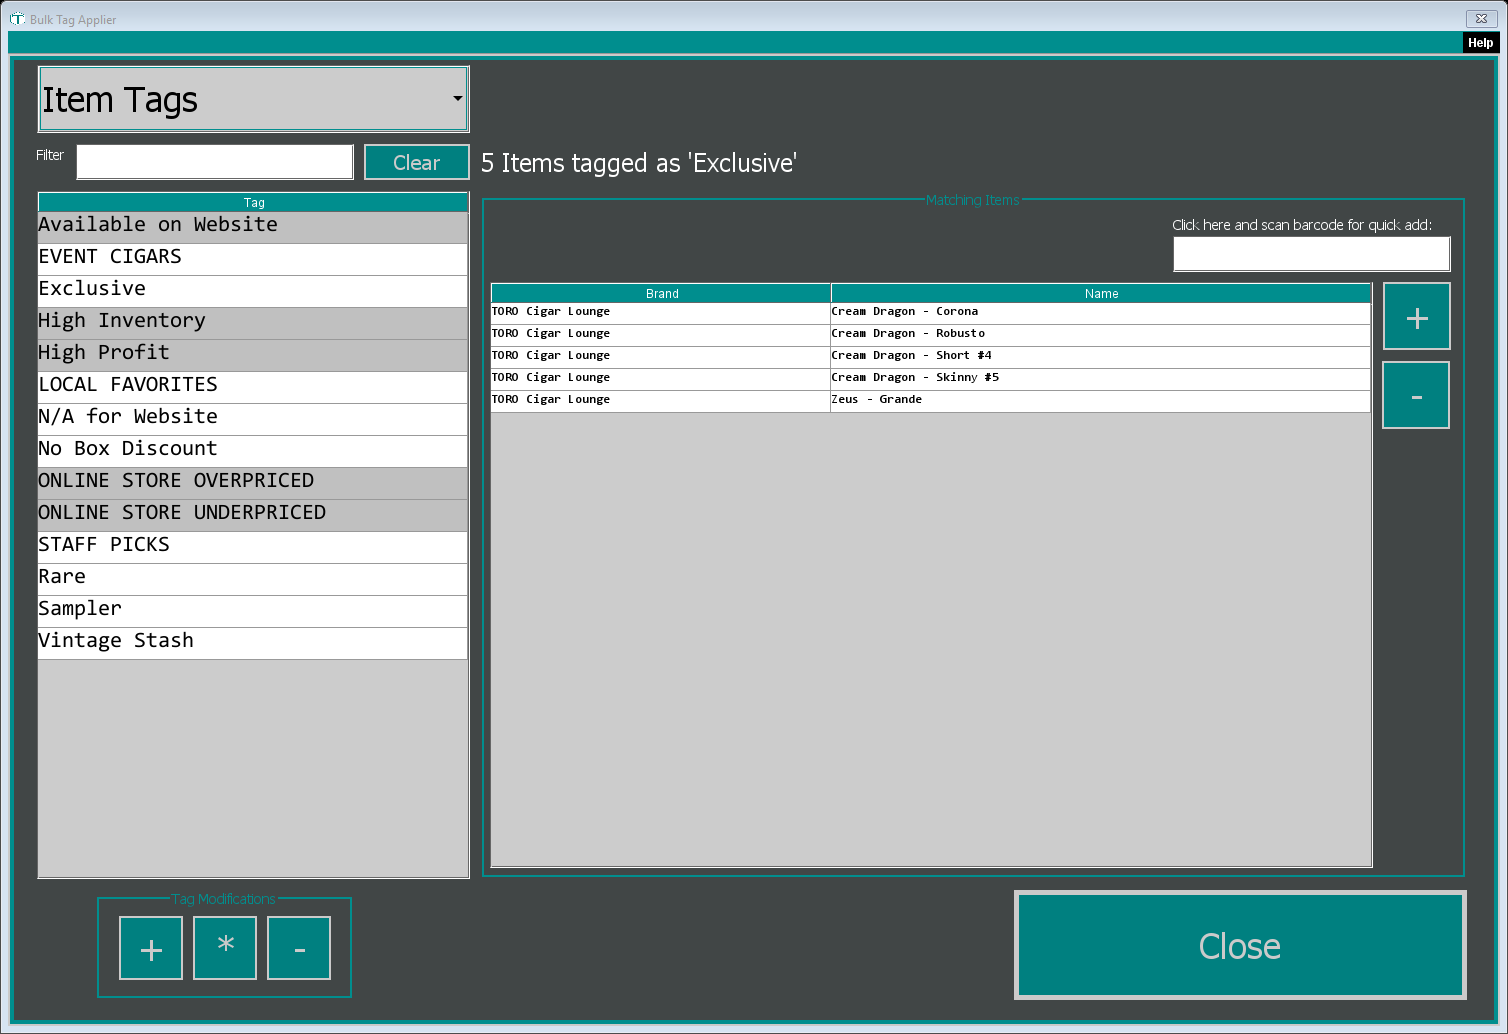
How the Window Is Laid Out
- The box at the top left chooses which kind of tags you're looking at. Item Tags is the one for products. (It can also switch to Account Tags, the tags you put on customers.)
- The tag list on the left shows every tag of that kind. Type in Filter to narrow it down; Clear empties the filter.
- Matching Items on the right shows the active items that carry the tag you've picked, and the line above it counts them, for example 5 Items tagged as 'Exclusive'.
- Tag Modifications under the list has three buttons: + to create a tag, * to edit the picked tag, and - to delete it.
Some tags show with a grey background. Those come built into TORO and are used by its own features, so their editor opens read-only. Leave them in place.
Creating a Tag
Click + under Tag Modifications
The Tag Editor opens. Type a Name for the tag. This is the only thing you have to fill in.
Add a Description if you want a reminder of what the tag is for.
If you sell online through TORO, tick Show in Online Store to have this tag appear on your online store. TORO adds the tags that have it ticked to the end of the item's product description there, as hashtags. Leave it unticked for tags that are only for you, like "Reorder Next Month."
Click Save
The new tag appears at the top of the list.
To rename a tag or change its description, pick it in the list and click *, make your changes and click Save.
Putting a Tag on Items
Click the tag in the list first. If you skip that, TORO stops you with "Must select a Tag."
Then click + next to Matching Items. The Item Catalog opens. Highlight the items you want (you can pick several at once) and click Select. They're tagged right away and appear in the list.
There's no Save button for this. Every tag you add or remove is saved the moment you do it.
Taking a Tag Off Items
Pick the tag in the list
In Matching Items, highlight the item or items to take it off
Click - next to the list
TORO asks "Are you sure you want to remove the 'Exclusive' tag from this item?" (or "…from these 3 items?" when you picked several). Click Yes
The items themselves aren't touched; they just stop carrying that tag. You can put it back the same way you added it.
Deleting a Tag
Pick the tag and click - under Tag Modifications. If any items carry it, TORO tells you how many and that deleting the tag removes it from all of them, then asks "Are you sure you want to remove this tag?"
Deleting a tag can't be undone. You'd have to create it again and re-tag every item, so if you only want to clear it off a few items, use the - next to Matching Items instead.
Other Ways to Tag
- From a purchase order. The purchase order editor has a Tag Items button that tags everything on the order in one shot. See Creating a Purchase Order.
What You Can Do With Tags
A few places in TORO let you work with a tag instead of picking items one by one:
- Barcode Tool narrows its list to a tag, handy for working through one group's barcodes. See Printing and Managing Barcodes.
- Calculate Inventory Total can count only tagged items, or leave them out. See What Your Inventory Is Worth.
- Promotions can include or exclude items by tag. See TORO Promotions — Buy X Get X Free Deals.