Safe and Bank Deposits
Every night when you close out, the cash you pull from the drawer goes into your safe, and sooner or later it goes from the safe to the bank. The Safe Deposits & Cash Deposits window is where TORO keeps track of that whole trip: what's sitting in the safe, which nights' cash someone has actually counted, and how much of the month's cash sales still needs to be deposited.
Use it when you're checking the safe, when you're about to take cash to the bank, and when you've just come back from the bank.
Finding It
Open the Dashboard
Click the Store tab on the left, then click the Safe & Bank Deposits card. (Can't find it? Type "safe" in the search box at the top right.)
You can also open it from the sidebar of the main screen: tap Admin, then Manage Safe Money & Bank Deposits.
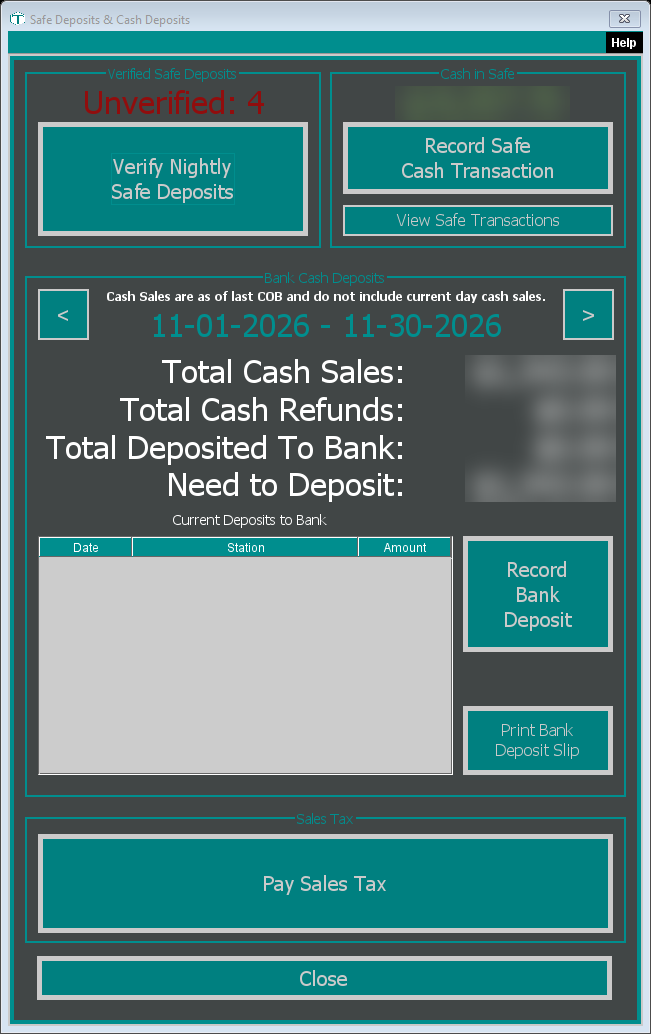
The window has four parts.
Verified Safe Deposits: Checking Each Night's Cash
When you close out at night and move cash to the bank, TORO keeps that amount as a safe deposit waiting to be verified. Unverified at the top left counts how many are waiting. It shows in red while there are any, and in green when everything has been checked.
Verifying means someone counts the cash bag from a night's close and confirms it matches what TORO expected. It's a good habit for a manager or owner, ideally someone other than the person who closed.
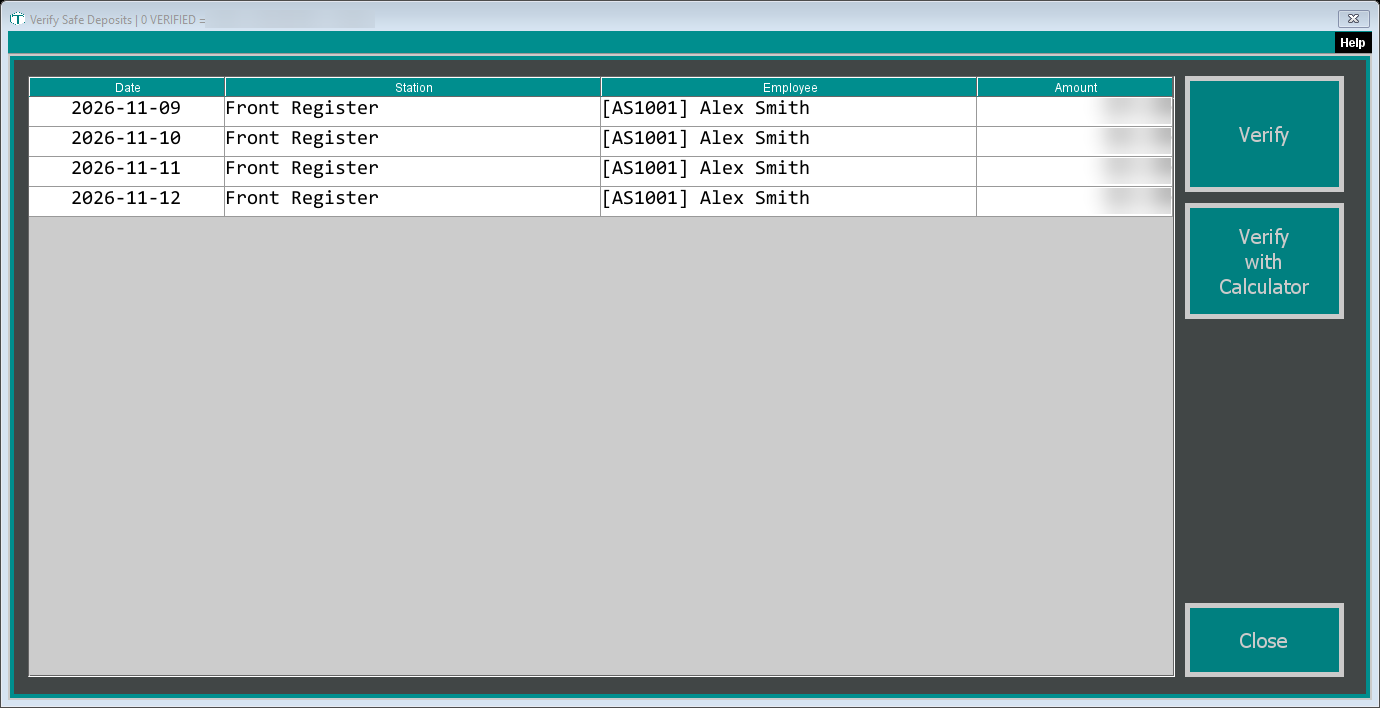
Click Verify Nightly Safe Deposits. The Verify Safe Deposits window lists every unverified night with its Date, Station, Employee (who closed) and Amount.
Click a night, count its cash, then do one of these:
- Click Verify. TORO shows the amount and asks "Correct amount of cash is present?" Click Yes.
- Or click Verify with Calculator (double-clicking a row does the same). Type how many 1, 5, 10 and 20 dollar bills you have, the total dollar value of any Large Bills, and the total of the Change. TORO adds it up as Calculated Cash and shows the Difference from what was expected. Click OK. It only verifies when the difference is zero; otherwise you'll see "There is a difference. This can not be verified. Contact Manager."
Verified nights drop off the list, and the window's title bar keeps a running count and total of what you've verified and what's left.
Click Close. If you verified anything, TORO asks whether to print a verification receipt to put around the cash. It lists each night you verified with its date, the closing employee's ID and the amount, plus the total.
Cash in Safe: The Running Safe Balance
Cash in Safe at the top right is TORO's running total of what should be in your safe. Only admins see the amount. It shows in green, and turns red if it ever goes below zero.
What changes it:
- Each night's close adds to it. The cash you move to the bank when you close is recorded automatically as a Deposit to Safe.
- Anything you record yourself with Record Safe Cash Transaction (below).
- Bank deposits you record with Record Bank Deposit take money out of it.
Cash drops made during the day with Drawer - Add/Remove Cash are not added here.
Recording money going in or out of the safe
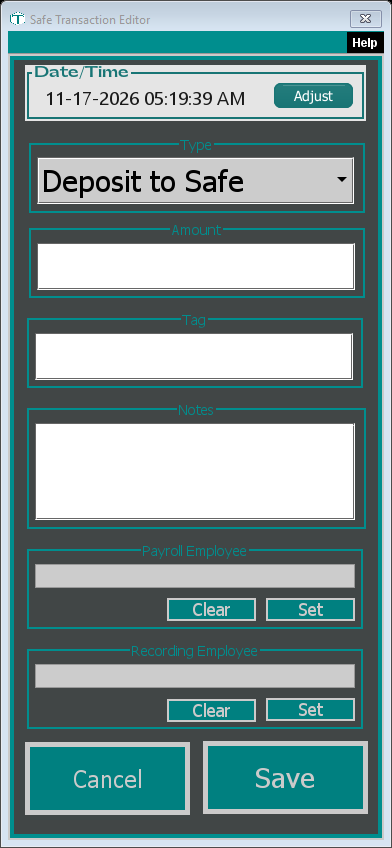
Click Record Safe Cash Transaction. The Safe Transaction Editor opens with today's date and time and your name already set as the Recording Employee.
Pick the Type:
- Deposit to Safe adds money to the safe.
- Withdraw from Safe, Expense and Payroll take money out.
Type the Amount as a plain number with no dollar sign, such as
150. Always type it as a positive number; TORO subtracts it for you when the type takes money out.Add a Tag or Notes if you like, so you'll remember later what it was for.
For Payroll, click Set under Payroll Employee and choose who was paid. TORO won't save a payroll entry without one.
Click Save. TORO confirms with "Amount recorded." and the Cash in Safe total updates.
Use Adjust next to the date if you're recording something that happened earlier.
Looking back at safe activity
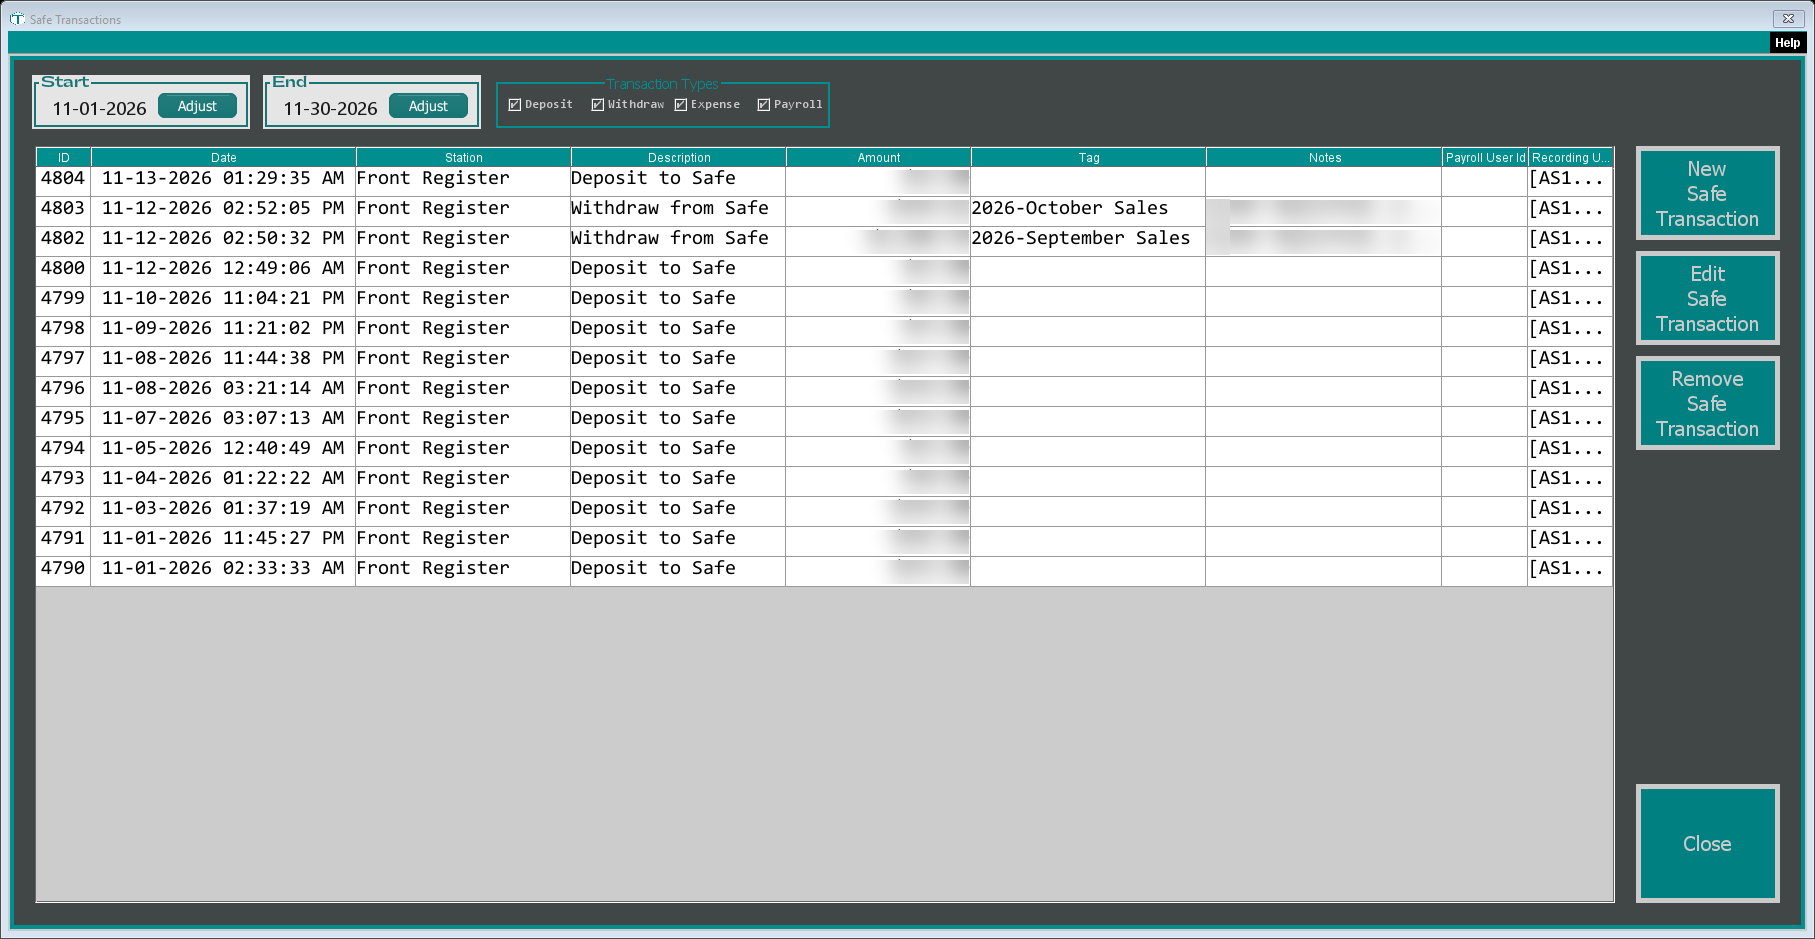
Click View Safe Transactions to see every entry for the month you're looking at. Change the Start and End dates with their Adjust buttons, and use the Deposit, Withdraw, Expense and Payroll boxes to show only some types. Each row shows its ID, Date, Station, Description, Amount, Tag, Notes and who recorded it.
- New Safe Transaction records a new entry. Here the Recording Employee starts empty, so click Set and choose who's recording it before you save.
- Edit Safe Transaction (or double-click a row) opens the entry so you can correct it.
- Remove Safe Transaction deletes the selected entry after you confirm. It's gone for good and the safe total changes with it, so only remove an entry that really was a mistake.
Bank Cash Deposits: What Still Needs to Go to the Bank
The middle of the window works one calendar month at a time. The dates under the heading show the month, and the <** and **> buttons step back and forward.
- Total Cash Sales is the cash you took in that month. As the note says, it only counts up to your last close, so today's cash isn't in it yet.
- Total Cash Refunds is cash you paid back out on refunds.
- Total Deposited To Bank is the bank deposits you've recorded for that month.
- Need to Deposit is what's left: cash sales, minus cash refunds, minus what you've already deposited.
Current Deposits to Bank lists each bank deposit recorded for the month with its date, station and amount.
Recording a bank deposit
After you've been to the bank:
Use <** or **> to show the month the cash came from. TORO files the deposit under the month on screen, so if you're depositing October's cash in November, step back to October first.
Click Record Bank Deposit. You may need a manager's permission.
The Safe Transaction Editor opens already filled in: Withdraw from Safe, the Need to Deposit amount, and a Tag naming the month (like 2026-October Sales), which you can't change. If you deposited a different amount, change the Amount to what you actually deposited.
Click Save. The deposit appears under Current Deposits to Bank, Need to Deposit goes down, and Cash in Safe goes down by the same amount.
A Withdraw from Safe you record yourself with Record Safe Cash Transaction takes money out of the safe but doesn't count as a bank deposit for any month. Use Record Bank Deposit for trips to the bank.
Printing a deposit slip
Print Bank Deposit Slip prints a slip to take with the cash. TORO first asks "Do you want the Cash Calcuator to calculate the amount?"
- Yes opens the same bill-counting calculator described above, set to expect the Need to Deposit amount. It only accepts a count that matches exactly.
- No asks "How much are you depositing?" with the Need to Deposit amount filled in. Change it if you're depositing a different amount.
The slip shows the date, the month, the amount, your store's name (and bank account number, if one is saved in TORO) and who's making the deposit. Printing the slip doesn't record anything. Once the money is in the bank, record it with Record Bank Deposit.
Pay Sales Tax
The Pay Sales Tax button at the bottom opens the same sales tax screen as the Sales Tax card on the Dashboard's Store tab.