Setting Up a Credit Card Terminal
When a new card reader shows up, or you're moving one to a different register, you tell TORO about it by adding it as a terminal. It only takes a minute, and the new terminal is ready to use the moment you save — no need to close and reopen TORO.
Do this on the register that will use the terminal. This is the part people miss. If you have more than one POS station, the terminal gets linked to whatever station you're standing at when you add it. So walk over to the register the reader is plugged into, and do the setup there. Adding it from a different station links it to the wrong register.
Adding the Terminal
Go to the main screen of TORO.
On the side bar, select the Admin menu item.
Select the Dashboard menu item. (Need help with this part?)
On the side bar of the Dashboard, select Store.
Select the Credit Card Information tile. (Can't find it? Type "credit card" in the search box at the top right. You can also get there from the Help menu on the main screen's side bar, by selecting Help with Credit Card Issues. It opens the same window.) You should now see a window called Credit Card Contact Information.
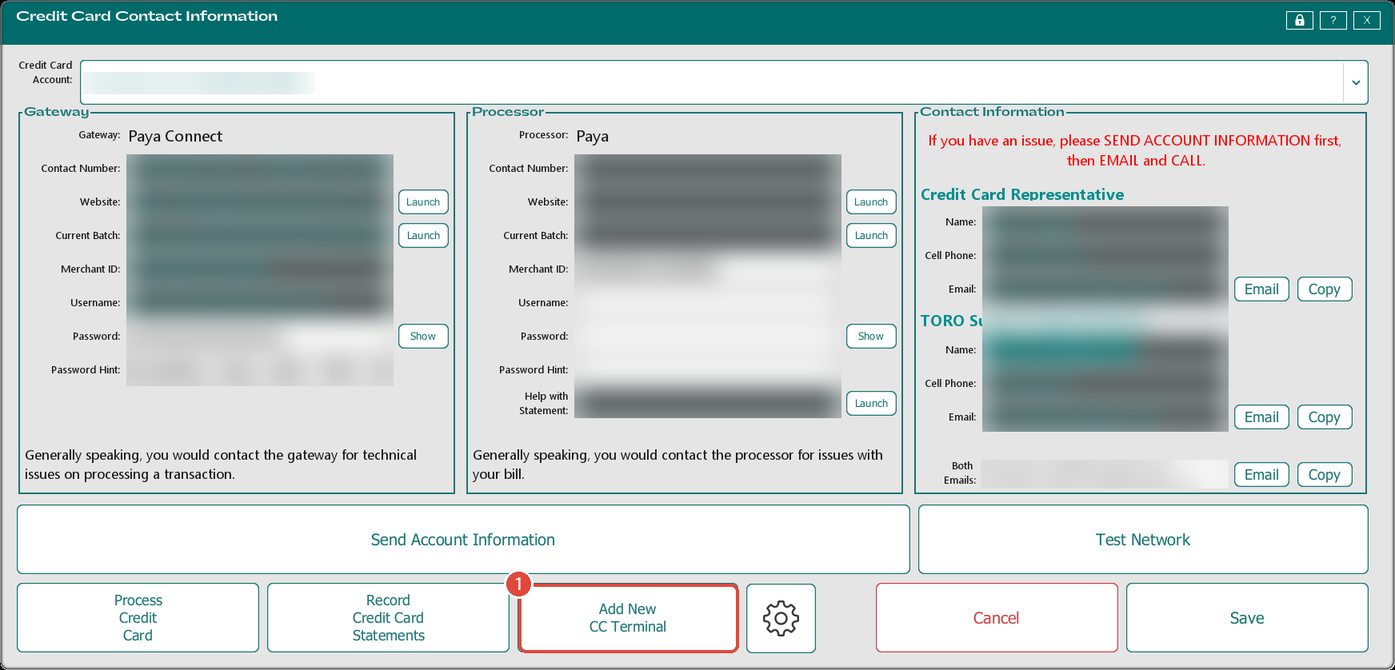
Tap Add New CC Terminal. TORO first confirms which register you're linking to — the pop-up (titled Swap Credit Card Terminal?) shows the Station Name, so check it to be sure you're on the right one — then tap Yes.
You should now see a window called Credit Card Device Editor. Fill in the two name fields (both explained below). Your processor will also give you a Device Key and a Serial Number — these are required, so enter them too (ask your TORO rep in your store's WhatsApp group if you don't have them yet). Then tap Save.
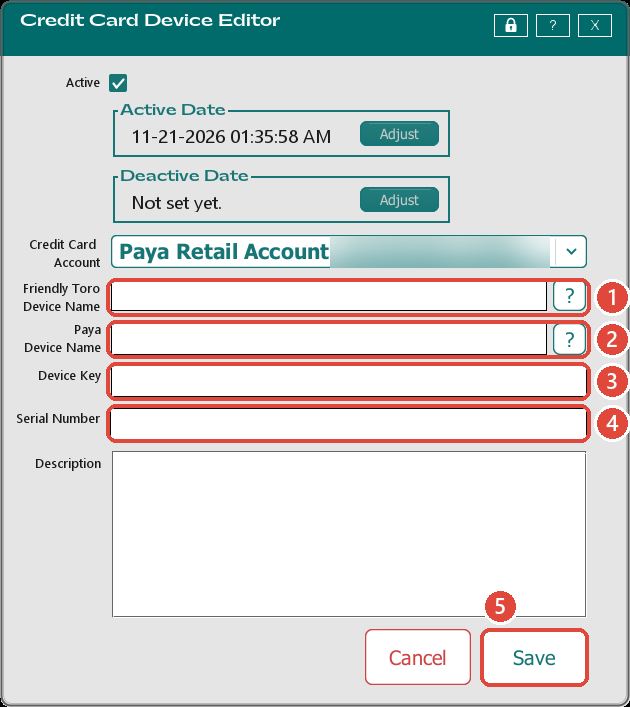
That's it. The new terminal immediately becomes the active card reader for this register, and the window title at the top of the screen updates to show it.
Admins: there's a second way in.
- Go to the main screen of TORO.
- On the side bar, select the Admin menu item.
- Select the Dashboard menu item.
- On the side bar of the Dashboard, select TORO Configuration.
- Select the Set Up System tile. (Need help with this part?)
- On the side bar of the Setup window, select the Setup tab.
- Select the Set Up Credit Cards tile.
- Select Advanced Credit Card Settings. You should now see a window called Credit Card Processor Settings.
The Retail Account - Card Present panel has the same Add New CC Terminal button. It works exactly the same way, links the terminal to the register you're standing at, and the new terminal shows up in that window's device list straight away.
The Two Name Fields
Each field has a ? button next to it if you want a reminder on the screen — but here's what they mean.
Friendly Toro Device Name
This is just the name you want to see when you're running a credit card — something you and your staff will recognize, like Front Counter or Register 1. Pick whatever makes sense to you. It has no effect on processing; it's purely for your own clarity.
Paya Device Name
This one ties your reader to your processor. Ask your TORO rep in your store's WhatsApp group for the Paya Device Name — it's usually something like Term #0001. (Depending on your processor, this field may instead be labeled "USAePay Device Name" or "CCP Device Name" — it's the same field.)
It doesn't have to be a perfect match to start using the terminal, but getting it right really pays off later: if you ever have a device issue, this is one of the first things support checks. It's highly recommended.
Waiting on your TORO rep to get back to you? Don't let it hold you up. Just type UPDATE LATER in this field for now, finish the setup, and start taking cards. You can come back and fix it once you have the real name.
Switching a Register to a Terminal You Already Have
If the terminal is already set up in TORO and you just want this register to use a different one (say you moved a reader from the back counter to the front), you don't need to add it again:
Go to the main screen of TORO on the register you're changing.
On the side bar, select the Config menu item.
Tap Credit Card Devices (or hover over it with the mouse). A second list opens beside it. You'll see every active terminal on your card account, listed by its Friendly Toro Device Name. The one this register uses now has a check mark.
Click the terminal you want.
That terminal becomes this register's card reader right away, and the title at the top of the screen updates to show it. Only the register you're standing at changes; the others keep their own terminals.
If Credit Card Devices is empty, TORO has no active card terminal to offer this register. Message your store's Credit Card Support Group on WhatsApp.
A Couple of Things Worth Knowing
One terminal per register. Saving a new terminal makes it the only card reader linked to that register — it clears out any reader that was previously assigned there. That's intentional: a register uses one terminal at a time. If you're swapping readers, the old one simply drops off and the new one takes over.
No restart needed. As soon as you save, the new terminal is live and the title bar reflects it. You can run a card sale right away.
If a card sale doesn't seem to be reaching the new reader, double-check you set it up on the correct register — that's almost always the cause. Still stuck? Send a message in your store's Credit Card Support Group on WhatsApp and we'll get you sorted.