Setting Up Tips
If your staff take care of people, tips are a real part of their pay. TORO's tip settings decide whether the tip line prints at all, what it says, what amounts you suggest, and who the money ends up with. It's one screen, and once it's set you rarely touch it again.
Opening the tip settings
- Open the Dashboard.
- Click the TORO Configuration tab in the list down the left side.
- Click the Set Up System card. The Setup window opens.
- Stay on the Setup tab and click the Set Up Tips tile.
The window that opens is titled Setup Tips.
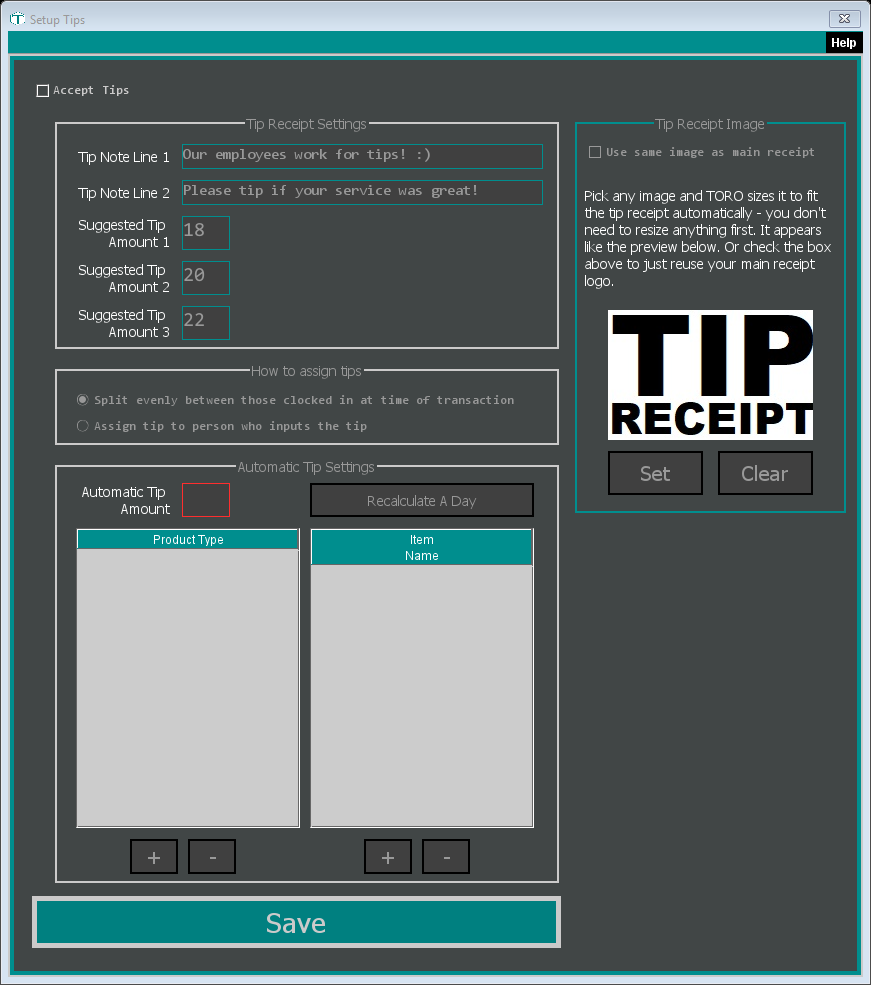
Everything on this screen is greyed out until Accept Tips (top left) is ticked. Tick it first, then work down the screen.
Turning tips on
Tick Accept Tips in the top-left corner. That's the master switch — it wakes up the four panels below it. Untick it and TORO stops printing tip lines entirely.
Ask Employee for Tip Amount when completing Transaction
Next to Accept Tips is a second tick box, and it changes how tips get collected day to day.
With it on, TORO asks for the tip right after the receipt prints on a card sale — so if your customer writes their tip on the receipt, the paper is already in their hand and you can key the amount in on the spot. A small window shows the amount, the last four digits and the name on the card, with three ways out:
- Save Tip — type the amount and it goes onto the card straight away.
- No Tip — the customer isn't tipping. The sale is settled and stops appearing on the tip work list. Only press this when you know there's no tip coming — if the customer might still write one on the receipt, use Input Tip Later instead.
- Input Tip Later — deal with it later in Tips for Day, exactly as before.
This is on by default. The alternative is collecting slips and typing them all in at close, which is where tips go missing — a slip blows off the counter, a number is unreadable, somebody forgets. Asking at the register while the sale is fresh gets far more tips to the people who earned them.
If it doesn't suit your shop, untick it and nothing changes from how TORO worked before.
Tick box greyed out? It only works when Accept Tips is on.
There's one case where TORO asks something different. If the customer paid by entering a PIN, their bank locked the exact amount and a tip can't be added to that sale at all — so instead of asking for an amount, TORO tells you the tip needs its own charge and offers to run the card again. Here's why that happens.
Tip Receipt Settings
This panel controls what your customer actually reads on the tip slip.
Tip Note Line 1 — the first line of your message. It starts out as "Our employees work for tips! :)". Maximum 44 characters, so it fits the paper.
Tip Note Line 2 — the second line. It starts out as "Please tip if your service was great!". Also 44 characters.
Suggested Tip Amount 1, 2 and 3 — the three percentages printed as suggestions, along with the dollar figure each one works out to. They start at 18, 20 and 22. Anything from 1 to 100 is allowed.
Tip Table Size — how big the Tip % / Tip $ / Total table prints on the slip. Normal keeps it the same size as the rest of the receipt; Large and Extra Large make it stand out. Pick a bigger size if your customers sign in low light or your average guest is over fifty — this is the block they read and circle, and it costs you nothing but a little paper.
Totals only - no line items (off by default) — when ticked, the slip your customer signs for a card payment shows just the totals and the tip lines, not every item they bought. It shows the date, transaction number, the card's last four digits, the payment total, the transaction total, the suggested-tip table and a signature line. The customer can still get the full itemized receipt. Gift card payments still print the full receipt for signing. The same tick box is also in Set Up Receipts, so you can change it from either screen.
With it ticked, Reprint asks whether you want the Full Receipt or the Tip Receipt.
Whichever size you choose, TORO measures the table against your receipt paper before printing and steps the size down on its own if a row would be too wide, so the Total column always lands on the page — even on a big box sale where the numbers run long.
If you're looking for this setting in Set Up Receipts, it used to live there as a Tips in Large Font tick box. It moved here so everything about your tip slip is on one screen, and it's a three-way choice now instead of on/off. Your receipts keep printing exactly as they do today until you pick something different.
Wording is worth a minute of your time. "Our team works for tips" reads better than a blank line, and three suggested amounts consistently beat none.
How to Assign Tips
Two choices, and only one can be on:
- Split evenly between those clocked in at time of transaction — the tip is divided among everyone on the clock when the sale happened. Fair in a shop where the whole floor serves the customer.
- Assign tip to person who inputs the tip — the tip goes to whoever keys it in. Fair where one person owns the sale start to finish.
Pick the one that matches how your shop actually runs, and tell your staff which one you picked. Nothing causes more friction than staff guessing.
Automatic Tip Settings
Some sales should carry a tip without anybody asking — a hookah table, a lounge service, a private event package.
- Type the percentage into Automatic Tip Amount (1 to 100).
- Use the + button under the Product Type list (on the left) to add whole categories that should trigger it. - removes the row you've highlighted.
- Use the + button under the Item Name list (on the right) to add individual items. - removes one.
- Click Save.
TORO confirms before removing anything, so a mis-click costs you nothing.
Recalculate A Day (top right of the panel) re-runs tip calculations for a single past day. Use it after you change how tips are assigned, or when a day's tips came out wrong. Click it, pick the date, and confirm — TORO asks "Are you sure you want to recalculate the tips for [date]?" before it does anything, and tells you Complete! when it's done.
Tip Receipt Image
The graphic printed on the tip receipt used to be fixed — changing it meant somebody dropping a file onto the computer. Now it's a panel on this screen, on the right-hand side, titled Tip Receipt Image.
The preview in the middle of the panel always shows exactly what will print.
Use your own image
- Click Set at the bottom of the Tip Receipt Image panel.
- Pick any photo or logo file (PNG or JPG).
- The Crop Your Logo window opens with an adjustable box over your image:
- Drag inside the box to move it.
- Drag a corner or an edge handle to resize it.
- Use + and − to zoom, or Fit to snap back to the whole image.
- Click Use Selection.
TORO sizes and saves it for you. You don't need to resize or edit the picture beforehand — pick the photo straight off your phone if you like.
To go back to no custom image, click Clear.
Or just reuse your receipt logo
Tick Use same image as main receipt at the top of the panel. The preview switches to your main receipt logo, and Set and Clear grey out because there's nothing left to choose.
Heads up: with this ticked, your store logo can appear twice on the tip receipt — once as the receipt header and again as the tip graphic. If that looks like too much, untick the box and use Set to pick something different.
Saving
Click Save at the bottom of the Setup Tips window. Changes take effect on the very next receipt.