Choosing Who Gets Messages and Emails From TORO
TORO keeps people in the loop on its own. It tells your staff when something happens in the store, like a drawer being opened for the day, a low cash drawer or an item that needs reordering, and it can send copies of certain emails to people outside TORO, like your accountant or your payroll company.
Two screens control who gets what:
Messages From TORO decides which of your employees get each kind of alert, and how each person gets it (email, text, Pushover or a TORO message).
Emails From TORO is your list of outside email addresses that get copied on purchase orders, store reports, payroll and invoices.
Both are on the same tab.
Finding Them
Open the Dashboard
Click the TORO Configuration tab on the left, then click the Set Up System card. (Can't find it? Type "setup" in the search box at the top right.)
Click the Communications tab on the left side of that window
Click Messages From TORO or Emails From TORO
Messages From TORO: Alerts for Your Staff
Only an Admin can open this screen. Anyone else sees "Only the Admin User can access these functions."
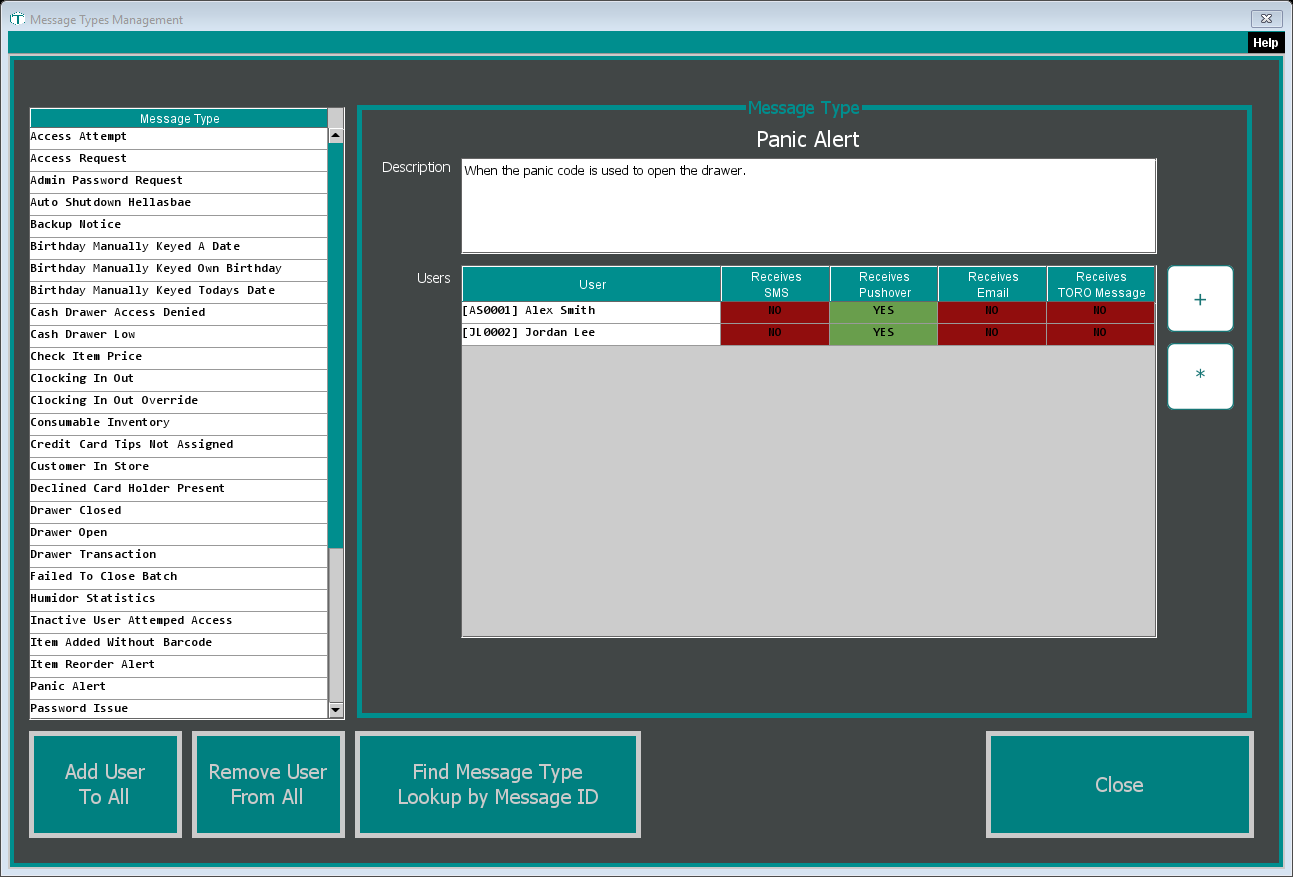
The list on the left is every kind of message TORO can send, such as Cash Drawer Low, Drawer Open, Item Reorder Alert and Panic Alert. Click one to see:
Description: what sets it off
Users: who gets it, with a YES or NO for each way they can get it (Receives SMS, Receives Pushover, Receives Email, Receives TORO Message)
Adding people to a message
Click the message in the list
Click + next to the Users table
Pick one or more employees and confirm
They're added with that message's standard delivery method. If any of them have the Send Store Reports employee setting turned off, TORO lists them and asks, "Would you like to turn it ON for all of these employees at once?" Click Yes. An employee with that setting off doesn't receive any of these messages, even when they're on the list.
Changing how someone gets a message
Select the person in the Users table and click * (or double-click their row). A window opens with the message's name at the top and the person's name under it. The How to Send table lists each way they currently get this message.
Click + to add another way. Pick it in the How to Send dropdown, then click Save. The choices include your store's email account, SMS Module (fees may apply), TORO Internal Message, and Pushover options (they start with Pushover -). For Pushover you also pick a Priority and a Sound.
Select a line and click * to change it.
Select one or more lines and click - to remove them. TORO asks you to confirm.
To take someone off one message completely, remove every line in their How to Send table.
Adding or removing someone everywhere at once
Add User To All puts one employee on every message type. If they were already on some, their delivery choices on those are reset to the standard method, so you may need to redo any custom ones.
Remove User From All takes one employee off every message type right away. There's no undo, so be sure before you click.
Both only work for an employee who has Send Store Reports turned on. Otherwise TORO says "This user does not have 'Send Reports' selected in their profile".
Why someone isn't getting a message
For anyone on the list, TORO only sends if:
the employee is active and has Send Store Reports turned on
for email, there's an email address on their employee profile
for SMS, their account is opted in to texts
for Pushover, a Pushover user key is saved for them
If any of those is missing, that person is skipped without any message on screen.
Emails From TORO: Outside Email Addresses
This is where you add people who aren't TORO users but should get copies of certain emails. The window is called External Emails.
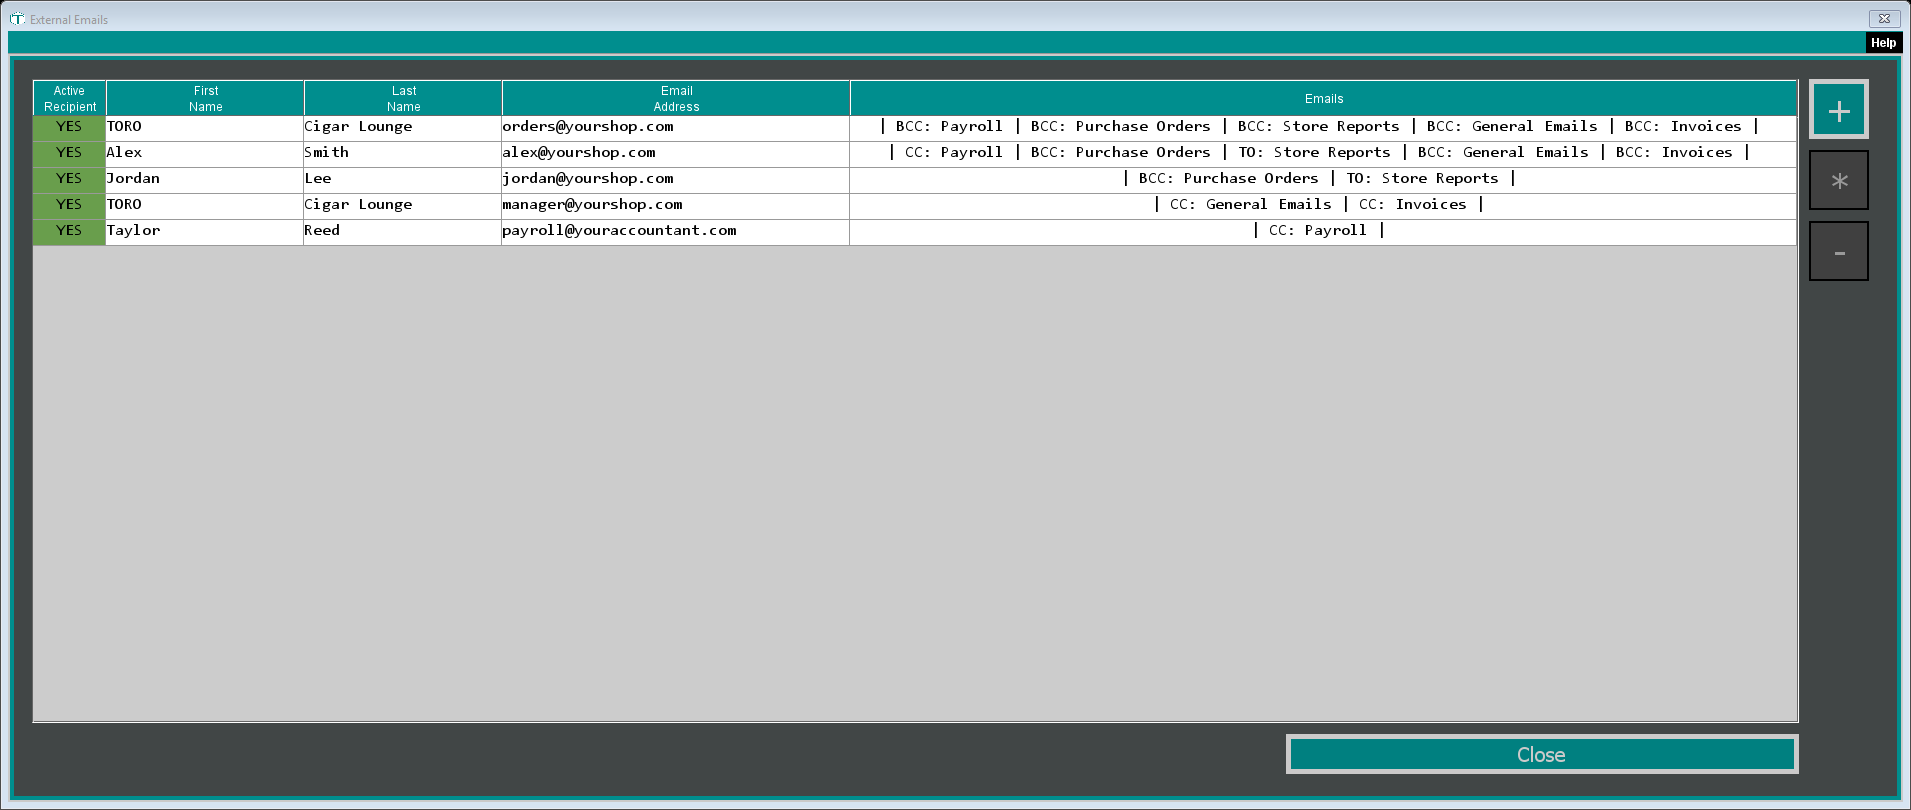
The Emails column shows what each person is copied on, and whether they're the main recipient (TO), copied (CC), or blind-copied (BCC).
What each email type sends them
| Email Type | They get a copy of |
|---|---|
| Purchase Orders | every purchase order you email to a vendor |
| Store Reports | your store report emails |
| Payroll | your payroll emails (Payroll module) |
| Invoices | the invoices you email to wholesale customers (Wholesale module) |
Adding someone
- Click +. The External Email Information window opens.
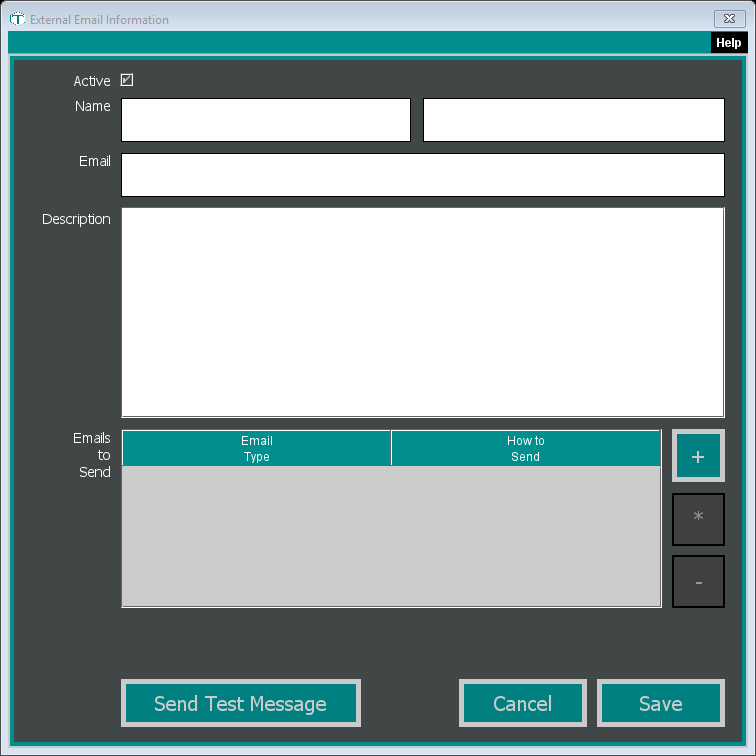
Leave Active ticked
Type their first and last name in the two Name boxes, and their Email. All three are required; Save won't close the window until they're filled in.
Next to Emails to Send, click +. Pick the Type (for example Store Reports) and How to Send (TO, CC or BCC), then click Save. Repeat for each type you want them to get. Each type can only be added once per person.
Click Send Test Message if you'd like to check the address. TORO sends a short test email and tells you it was sent.
Click Save
Someone with nothing under Emails to Send doesn't show up in the External Emails list, so give everyone at least one type.
When you save a new contact, TORO sends them a welcome email letting them know they've been added and asking them to add your address to their contacts so your emails don't land in spam. Give them a heads-up first.
Changing or removing someone
Select a row and click * (or double-click it) to change their details or what they receive.
If you untick Active and save, that person stops getting emails, but they also drop off this list, so you can't turn them back on from here. You'd have to add them again.
Select a row and click - to delete them. TORO asks, "Are you sure you want to remove this email?"