Exporting Your Inventory and Uploading a Count
Two tools on the Dashboard's Inventory tab move inventory in and out of TORO as a file:
- Export Inventory builds a list of your active items with their prices, as a report you can search, print or save as a spreadsheet. Shops use it for price lists, website updates and quick reference.
- Upload Inventory does the opposite for counts. If you counted your stock on a spreadsheet, it reads the file and sets each item's quantity on hand in one go.
Exporting Your Inventory
Finding It
Open the Dashboard
Click the Inventory tab on the left, then click the Export Inventory card. (Can't find it? Type "export" in the search box at the top right.)
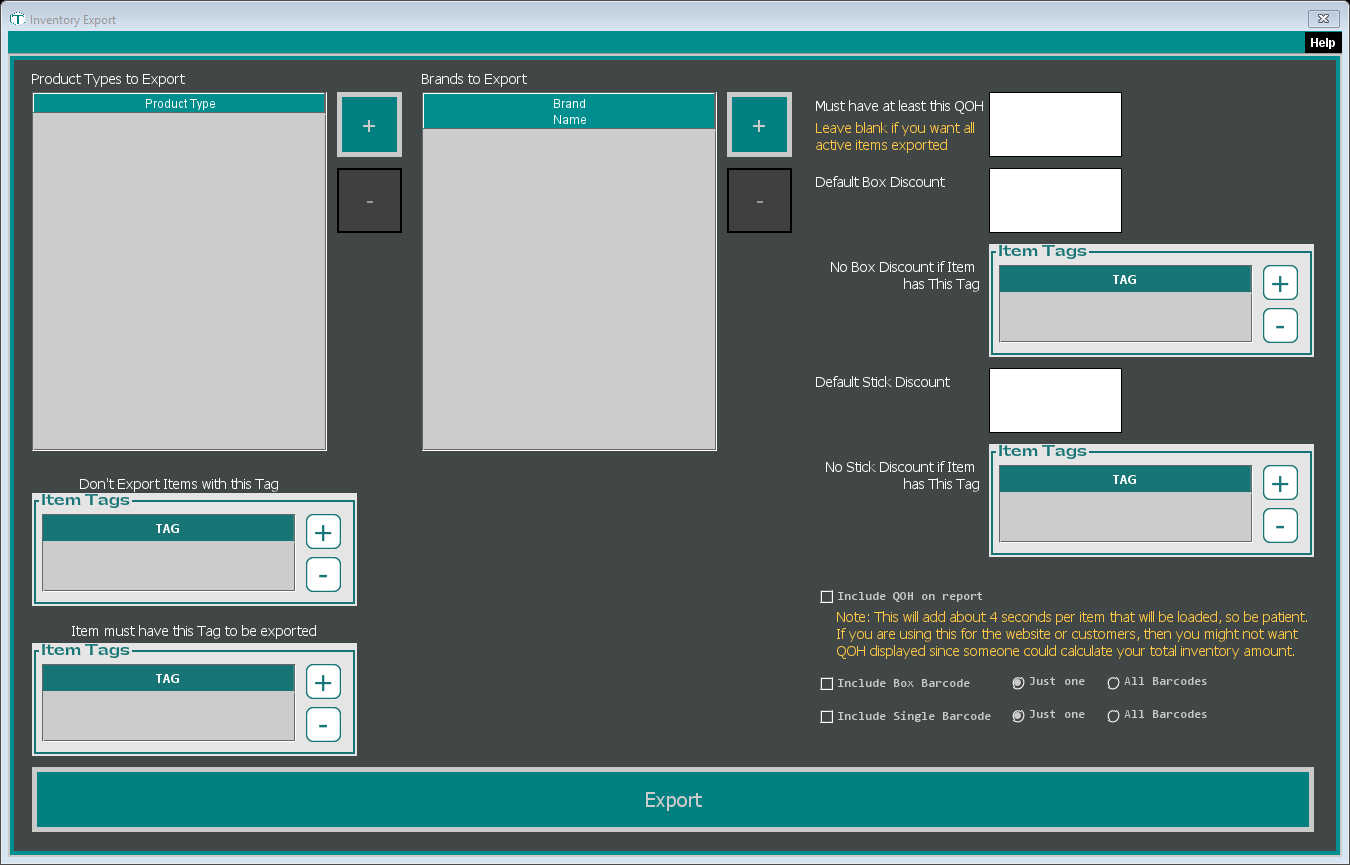
Choosing what goes in
Only active items are exported.
- Product Types to Export: click + to add the product types you want. You need at least one. Each product type becomes its own table in the report.
- Brands to Export: leave it empty for every brand, or click + to export only certain brands.
- Must have at least this QOH: only include items with at least this many on hand. Leave it blank to export all active items.
- Don't Export Items with this Tag leaves out items with any of the tags you add here. Item must have this Tag to be exported keeps only items that have one of them.
- Include QOH on report adds a QOH column. As the note on screen says, it adds about 4 seconds per item, and if the list is for your website or your customers you may not want to show it, since it gives away how much stock you carry.
Adding a discount column
To show a discounted price next to the regular one, type a discount into Default Box Discount (for boxes). Type it as a decimal: 0.10 is 10% off, 0.2 is 20% off. The report then gets Box Discount and Discounted Box Total columns. Add tags under No Box Discount if Item has This Tag to leave certain items at full price.
Default Stick Discount does the same for singles, with Single Discount and Discounted Single Total columns.
Box discounts on non-cigar product types: the column headings in those tables don't line up with the numbers under them (the heading Single Retail sits over the box discount, and so on). Read across from Box Retail in this order: box discount, discounted box total, then single retail. Cigar tables line up correctly.
Building the report
Click Export. TORO builds the report and opens it in your web browser. At the top are your store name, the date and time, and how many product types and items it includes. Below that is one table per product type, titled with the product type and the number of items.
Every table has Item Id, Brand, Name, Items/Box, Box Retail and Single Retail. Cigar product types also show Length and Ring Gauge. On cigar tables, the box discount columns sit right after Box Retail and the single discount columns right after Single Retail; on other tables they come after Single Retail. QOH comes after the prices.
When you export more than one product type, a Summary table at the top counts the items in each, and each product-type table starts collapsed: click its title bar to open it. In each table you can:
- type in the Search... box to filter the rows
- click a column heading to sort by it
- click Export to CSV to save that table as a spreadsheet file
Printing from your browser prints every table, opened up, without the search boxes and buttons.
Uploading a Count from a Spreadsheet
Upload Inventory reads a CSV file (the "comma separated" format any spreadsheet program can save as) where each row is one item. You need at least two columns: TORO's Item Id for the item, and the number you counted. A simple way to get a sheet with the right Item Ids is to export it first, as above, and add a column for your count.
This changes your stock. Every item in the file gets its quantity on hand set to the number in your file, and the whole upload is saved as one inventory record. There's no undo button. If something goes wrong, you can fix or delete the record afterward in Inventory History.
Finding It
Open the Dashboard
Click the Inventory tab on the left, then click the Upload Inventory card. (Can't find it? Type "upload" in the search box at the top right.)
First, TORO asks "What is your reason for doing these adjustments?" Type a short reason, like "Year-end count". It's saved with the inventory record, and the window won't open until you answer.
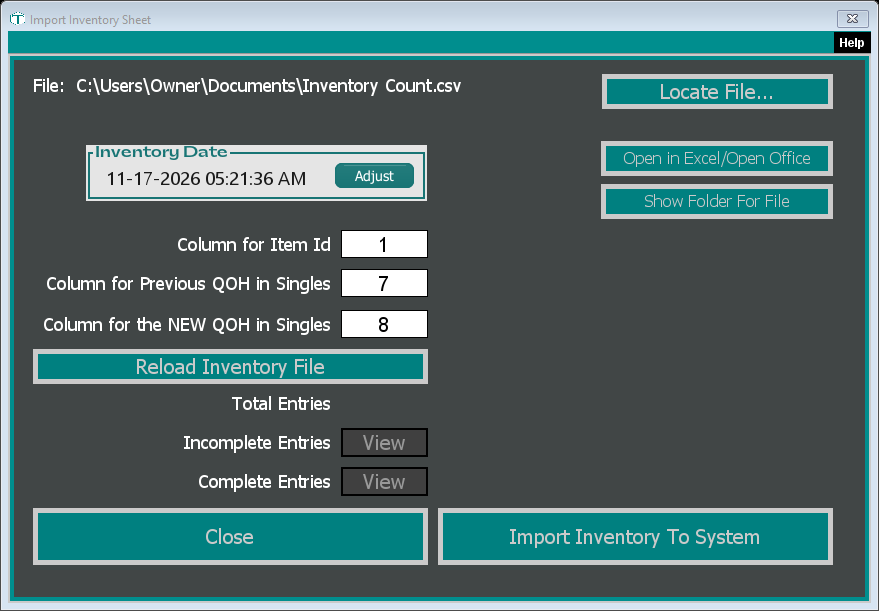
Step 1: Pick the file and the date
Click Locate File... and choose your CSV file. Open in Excel/Open Office opens it in your spreadsheet program, and Show Folder For File opens the folder it's in.
Set the Inventory Date with Adjust. It starts at right now. Set it to when you actually counted. TORO treats your numbers as the count at that moment, and anything sold or received after it still counts on top.
Step 2: Tell TORO which columns to read
Columns are numbered from the left, starting at 1 (column A is 1, column B is 2, and so on).
- Column for Item Id: starts at 1.
- Column for the NEW QOH in Singles: the column with your count. Count in single units, so a full 20-count box is 20.
- Column for Previous QOH in Singles (optional): the column with what TORO showed before you counted. If you leave it blank, TORO warns you and uses each item's quantity on hand in TORO right now instead. It's only used to work out how much each item went up or down; your new count is what gets saved.
Step 3: Load and check the file
Click Reload Inventory File. This is the step that actually reads the file, so do it before importing, and again any time you change the file or the column numbers.
TORO asks "Does the first line contain column headers?" Say yes if your first row is titles, so it's skipped.
TORO shows Total Entries and how many are Complete Entries. Click View next to Complete Entries to see them. The two numbers should match. If Complete Entries is lower, TORO stopped reading partway through the file, and only the rows before that point would be imported.
Every row needs a whole number in each column you named. If a cell isn't a whole number, TORO stops and tells you which, for example "Row #12 has an invalid value in the 'QOH' field. Must be an integer." The row number counts from your first item row. If a row is too short to reach one of your columns, TORO stops at that row without a message, which is why the two counts above are worth checking. Fix the file, then click Reload Inventory File again so nothing is left half-loaded.
Step 4: Import
Click Import Inventory To System.
TORO asks "Are you sure you want to import this inventory?", then shows the Inventory Date and how many entries you're importing, and asks "Is this date correct?"
Say yes to both. When TORO says "Importing complete!", the window closes.
What the import does:
- Saves one inventory record dated with your Inventory Date, with your reason in its note, so you can find it in Inventory History.
- Sets each item in the file to your count as of that date.
- Turns on inventory tracking for every item in the file, so any of them that were set to "always show 0" start tracking from your count.
If you close the window after loading a file but before importing, TORO checks: "You have entries that are complete, but not imported."