Online Store Pictures: Let TORO Handle Them, or Manage Them on Your Website
TL;DR
Your product pictures can be managed in one place: TORO, or your website. You can't use both at once. A single checkbox decides which, Use TORO to upload images, and it's on unless someone has turned it off.
- Leave it on if you want to keep everything in TORO. You add pictures to items in TORO and they go up to the website on their own. Anything added straight into WordPress will be replaced the next time that product syncs.
- Turn it off if you (or your web person) would rather manage pictures in WordPress. TORO then leaves pictures alone completely and only syncs everything else.
Most shops should leave it on. Turn it off only if someone is already looking after pictures on the website and wants to keep doing that.
Option 1: Let TORO Handle Pictures (the default)
With Use TORO to upload images on, TORO is in charge of every product's pictures. Each time a product syncs, TORO sends the website the full list of pictures it has for that item, and the website shows exactly that list.
That has two consequences worth knowing up front:
- Pictures added directly in WordPress don't stick. If someone uploads a photo to a product in WordPress, it's removed the next time TORO syncs that product, because it isn't in TORO's list.
- An item with no pictures in TORO shows no pictures online. If the website had photos for it, the next sync clears them. Before you rely on this setting, make sure your items have their pictures in TORO. The Find Items without Pictures button (see below) will point out the gaps.
Everyday stock updates don't touch pictures. When TORO only updates quantities on your website, the pictures stay exactly as they were.
Adding a picture to an item
Open the Dashboard, click the Items tab on the left, and click the Item Catalog card. (Can't find it? Type "catalog" in the search box at the top right.)
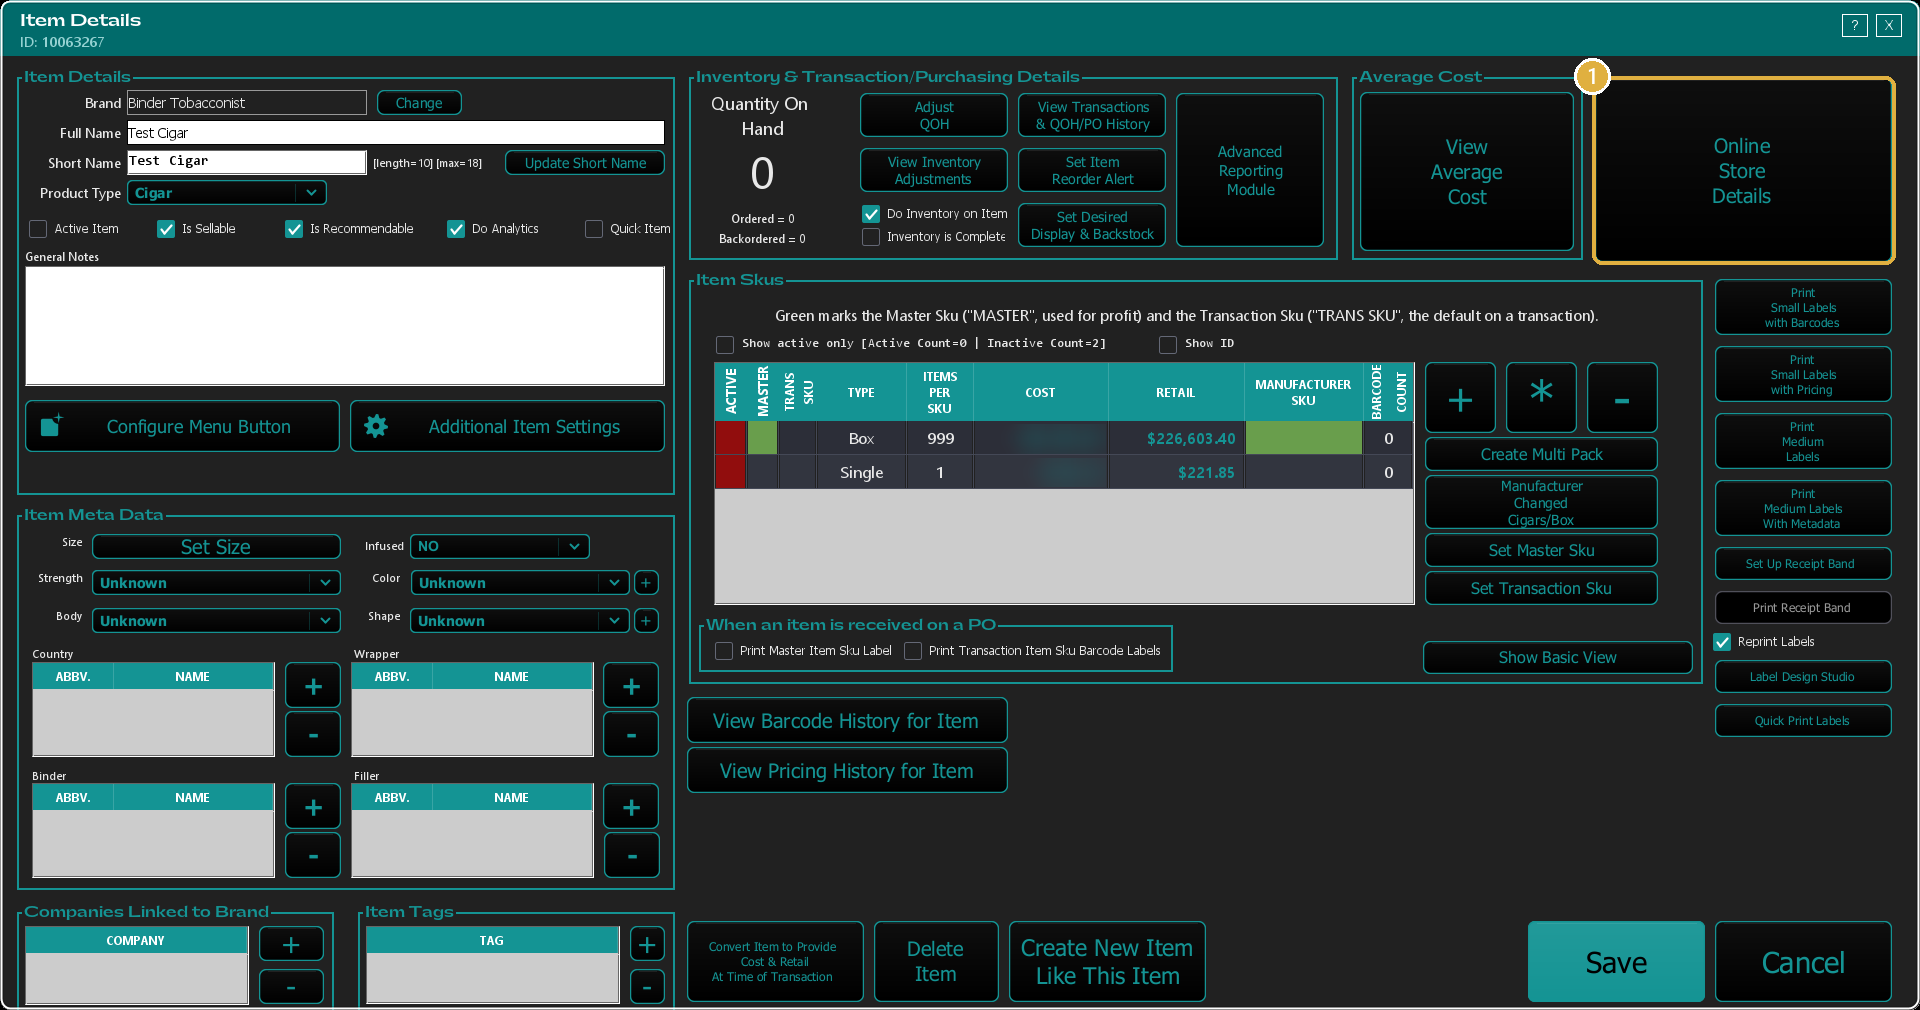
Find the item and open it. Its Item Details screen opens.
Click Online Store Details at the top right (1).
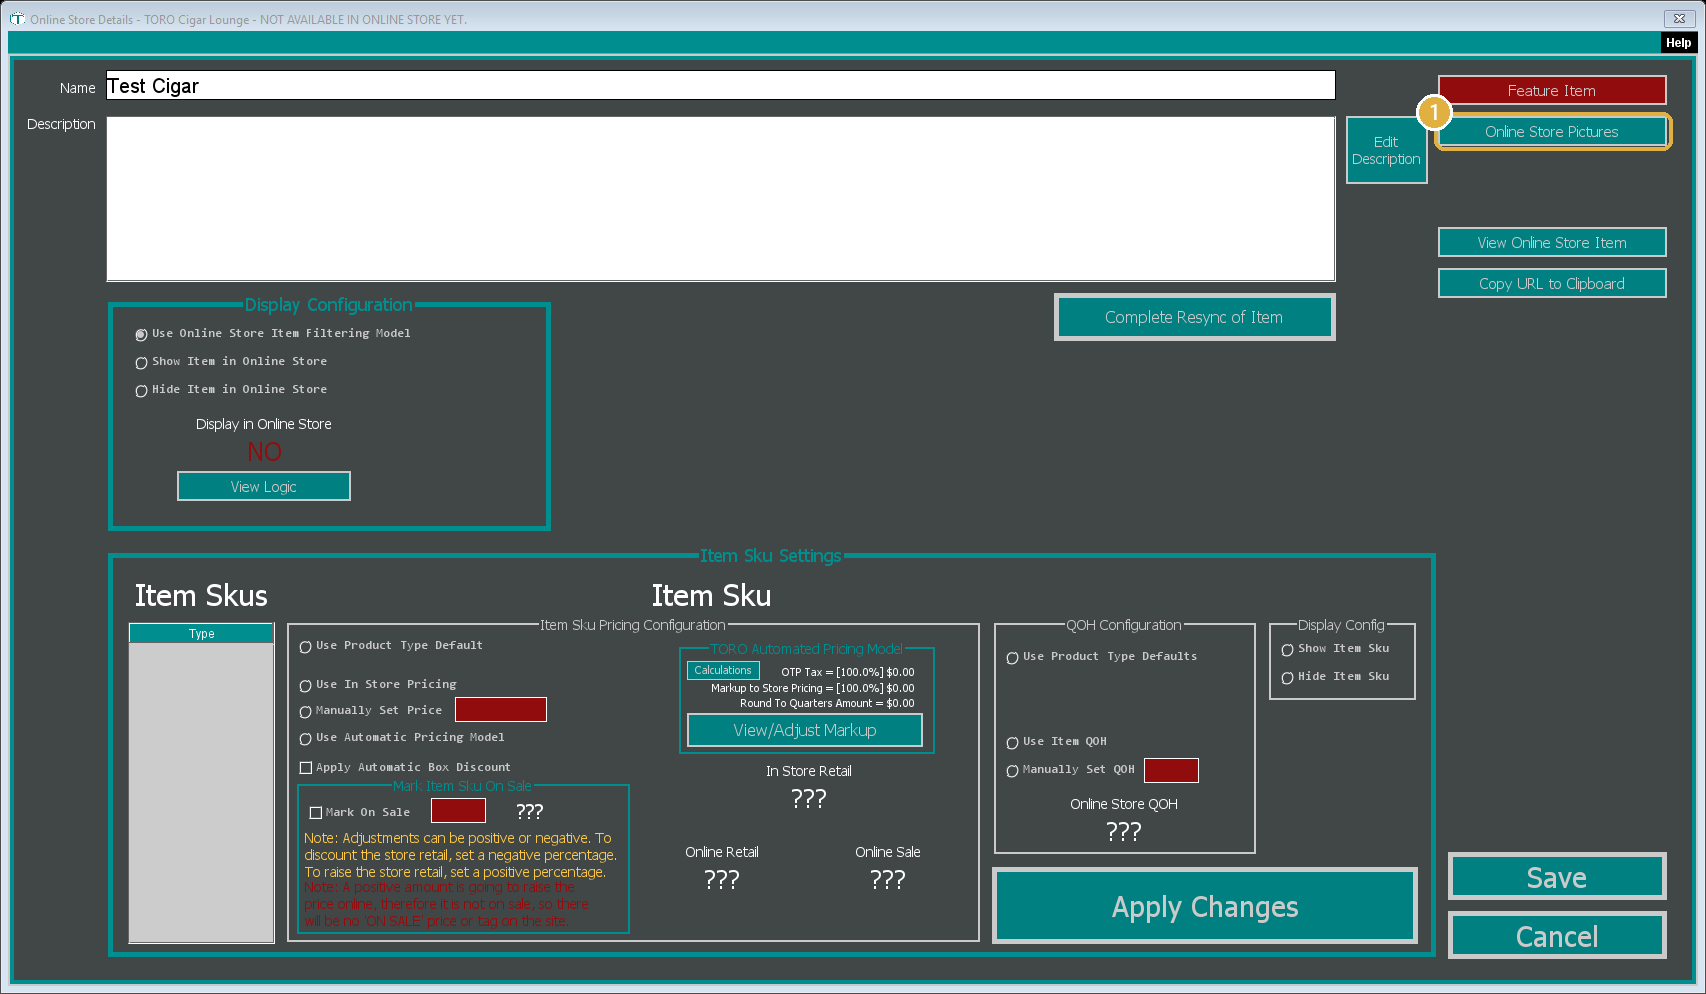
In the Online Store Details window, click Online Store Pictures at the top right (1). This opens the Website Images window for that item.
If TORO says it's unable to connect to your share drive instead, this register can't reach the shared folder where item pictures are stored so every register can show them. Usually the computer that holds it is off or has dropped off the network. Reconnect it and click Online Store Pictures again. If you've never set up a share drive, click Yes to open Share Drive Settings, or get in touch and we'll help.
Click the big + button (1) and choose the picture. It must be a PNG, JPG, or JPEG.
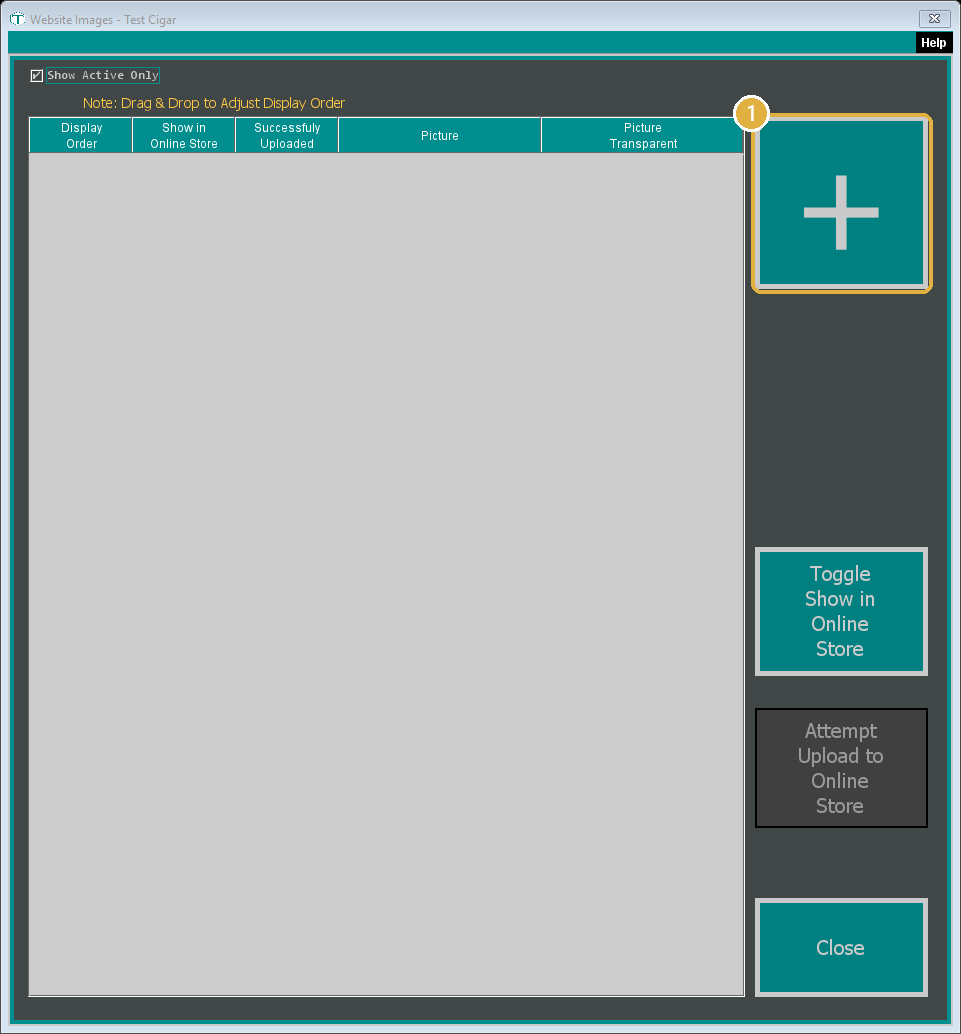
TORO uploads it to your website right away, and it shows up in the list.
You don't need to resize anything first. TORO shrinks large pictures to fit the website for you.
TORO may offer to make the picture transparent (remove the background) when you add it. That's optional, and TORO tells you the per-picture cost before it does it.
Changing, hiding, and ordering pictures
All of this happens in the same Website Images window:
- To swap a picture: add the new one, then select the old one and click Toggle Show in Online Store to turn it off. There's no "replace" button.
- To hide a picture without deleting it: use Toggle Show in Online Store. Turned-off pictures are left out of the next sync. Show Active Only hides them from the list so it stays tidy.
- To change the order: drag the rows up or down. The picture at the top is the one your website uses as the main product photo.
- If a picture didn't make it up: select it and click Attempt Upload to Online Store.
Finding items that are missing pictures
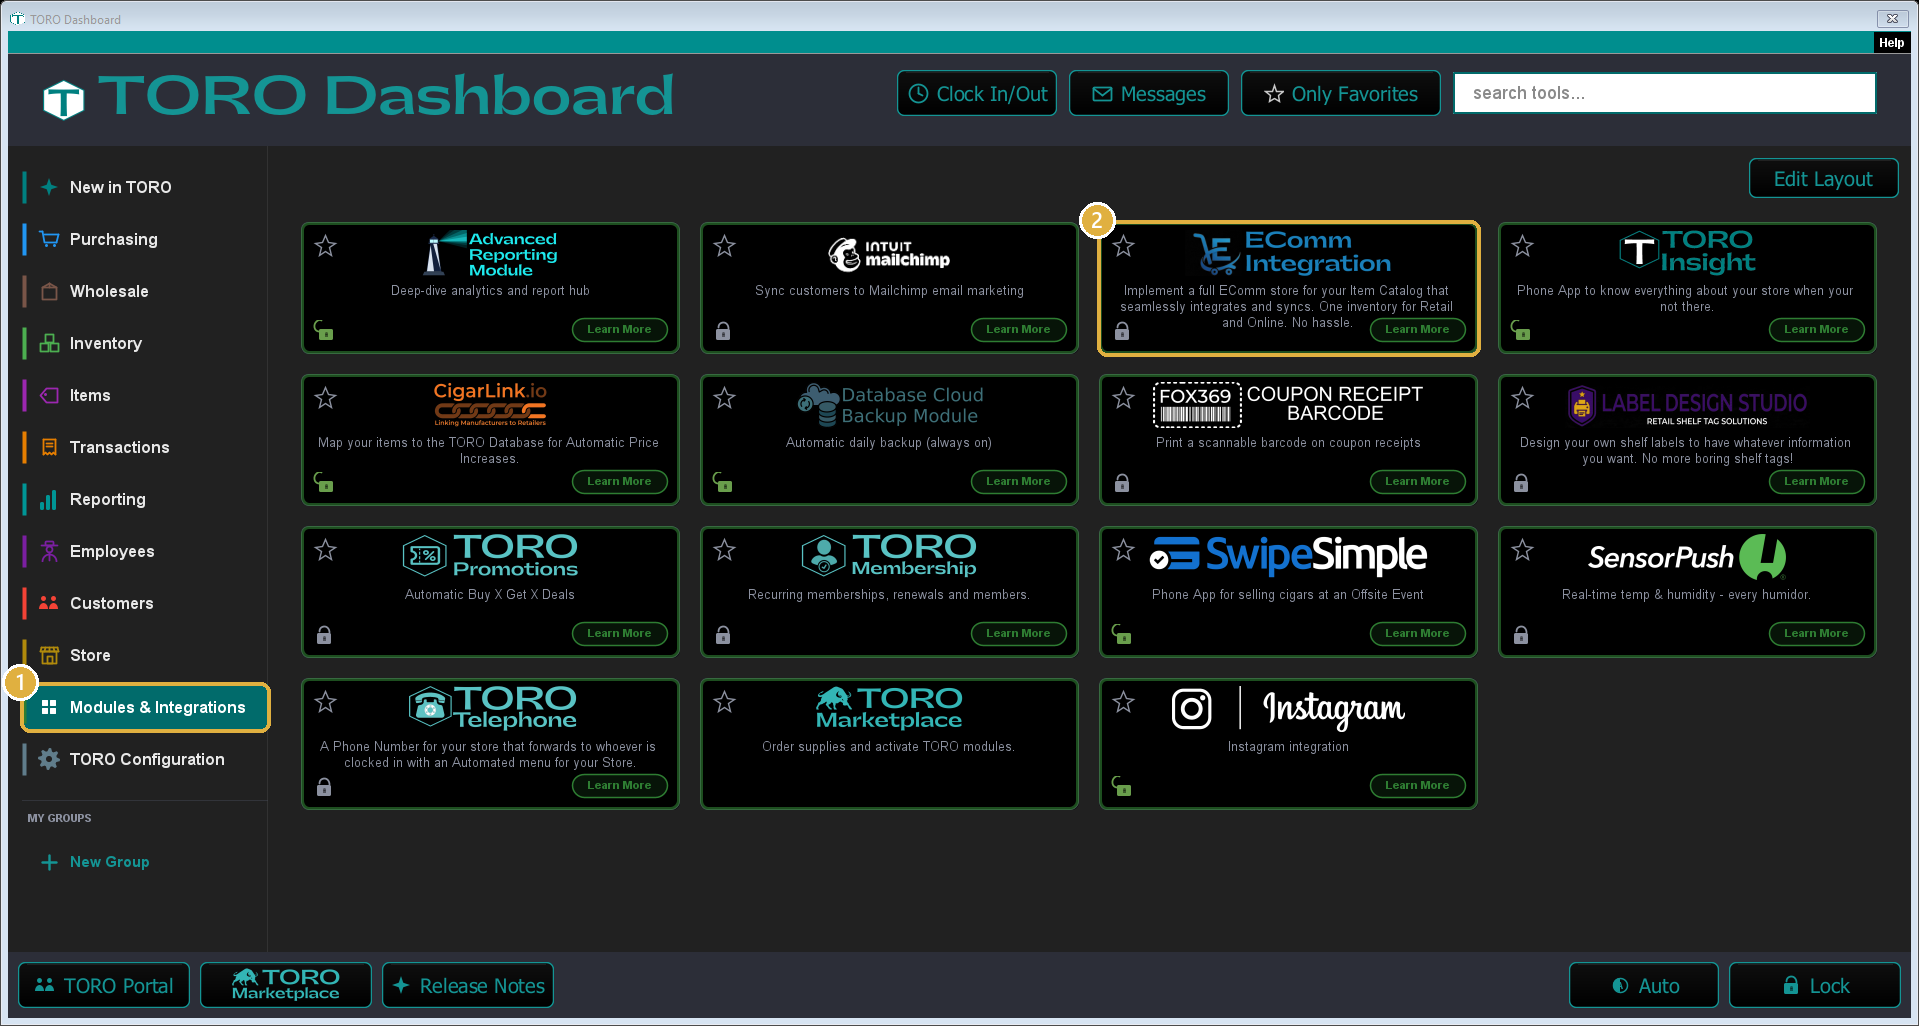
Open the Dashboard, click the Modules & Integrations tab on the left, and click the EComm Integration card. (Can't find it? Type "online store" in the search box at the top right.) The first screenshot in Step 1 below shows where both are.
In the Online Store window that opens, under Content, click Find Items without Pictures (1).
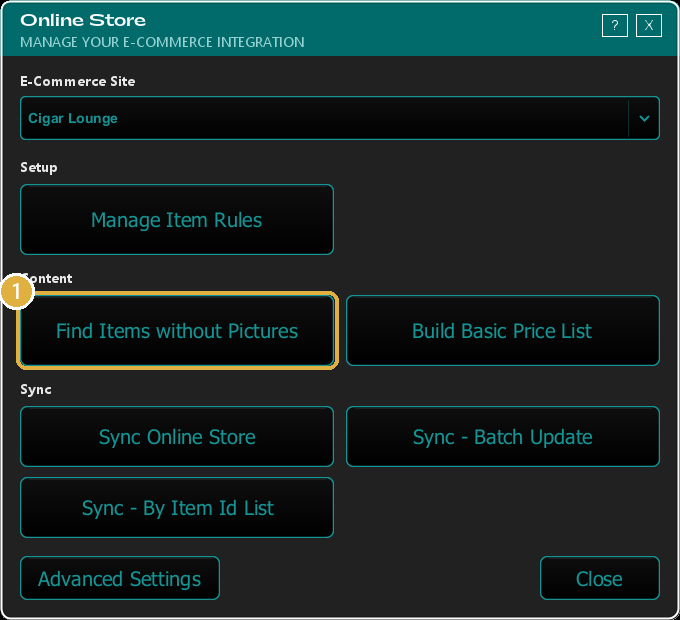
It lists the items that have nothing to show online, so you can work through them in one sitting.
Option 2: Manage Pictures on Your Website
If you'd rather handle pictures in WordPress, for example because a web designer already manages your product photos, there are two parts: switch picture handling off in TORO, then add pictures in WordPress.
Step 1: Turn TORO's picture handling off
In TORO, open the Dashboard.
Click the Modules & Integrations tab on the left (1).
Click the EComm Integration card (2). (Can't find it? Type "online store" in the search box at the top right.) The Online Store window opens.
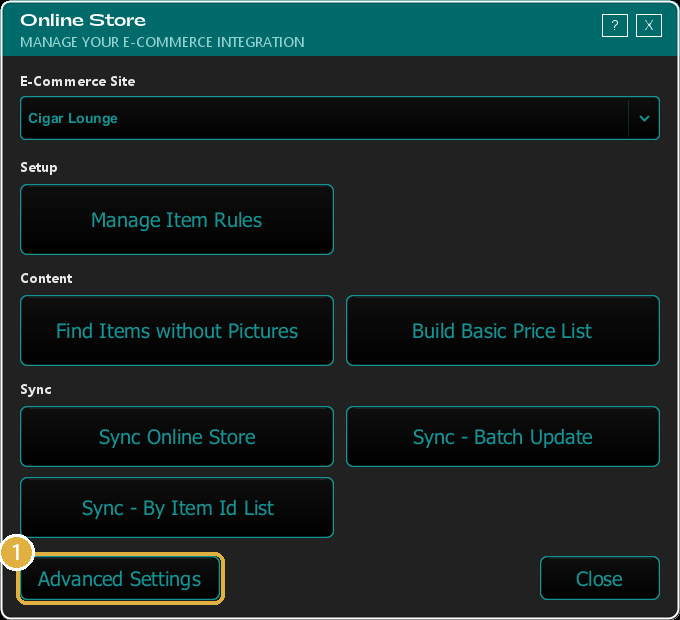
Click Advanced Settings at the bottom left (1). The ECommerce Site Viewer opens, listing your website.
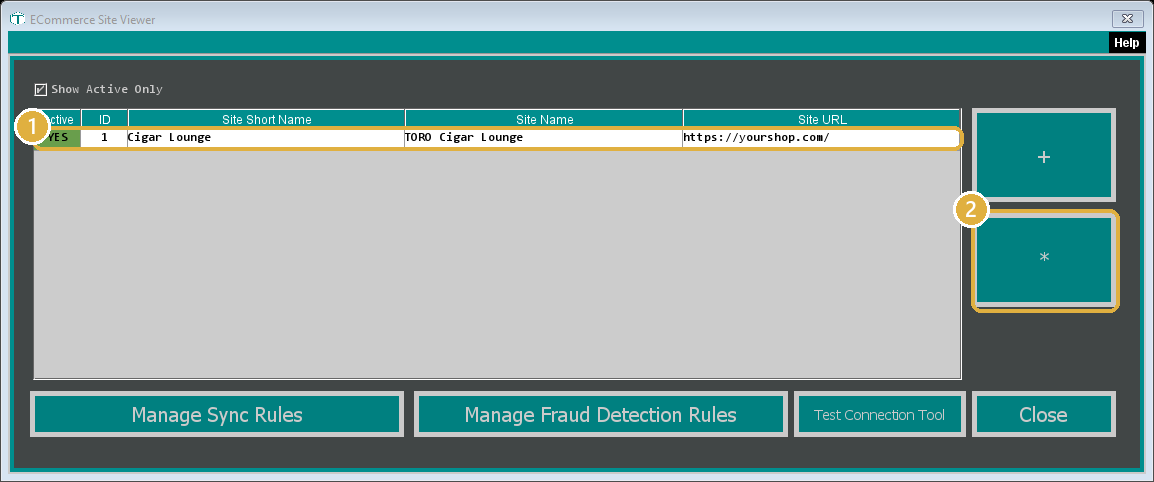
Click your website in the list to select it (1), then click the * button on the right, just under the + (2). The ECommerce Site Editor opens.
Near the bottom, untick Use TORO to upload images (1).
Click Save (2), then close the ECommerce Site Viewer and the Online Store window.
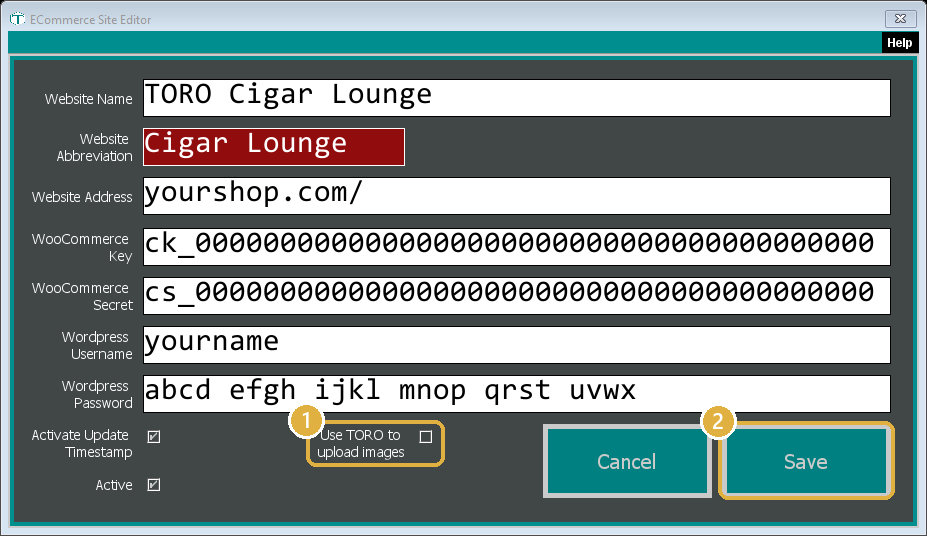
Leave everything else on this screen alone. The keys and password here are what connect TORO to your website.
From then on, TORO never sends pictures to that website. It doesn't add them, change them, or remove them. Stock, pricing, descriptions and everything else keep syncing as normal.
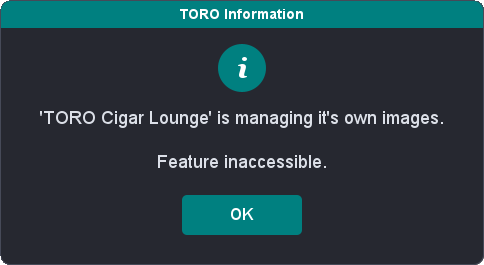
To check it took, open any item's Item Details, click Online Store Details, then Online Store Pictures. Instead of the picture window, TORO now shows this message. That's expected: there's nothing to manage on the TORO side any more.
Step 2: Add pictures in WordPress
Your website runs on WordPress, with WooCommerce as its shop. Pictures are added in the WordPress admin area, not on the website your customers see.
Log in to WordPress. In your web browser, go to your website's address with
/wp-adminon the end, for examplehttps://yourshop.com/wp-admin. Type your WordPress username (1) and your normal password (2), then click Log In (3). (Use your normal password, not the Application Password you gave TORO. That one only works for connections like TORO's, not for signing in.) You land on the WordPress Dashboard.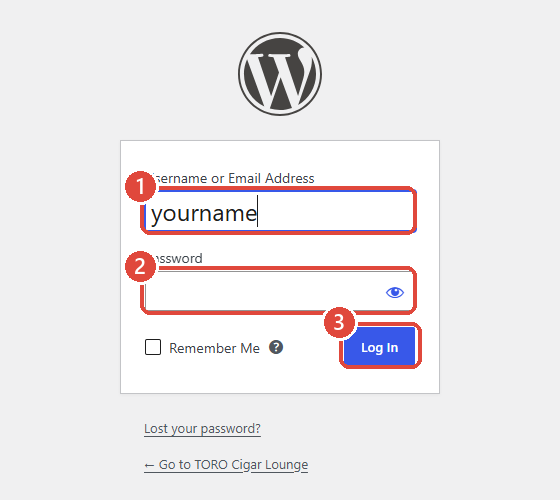
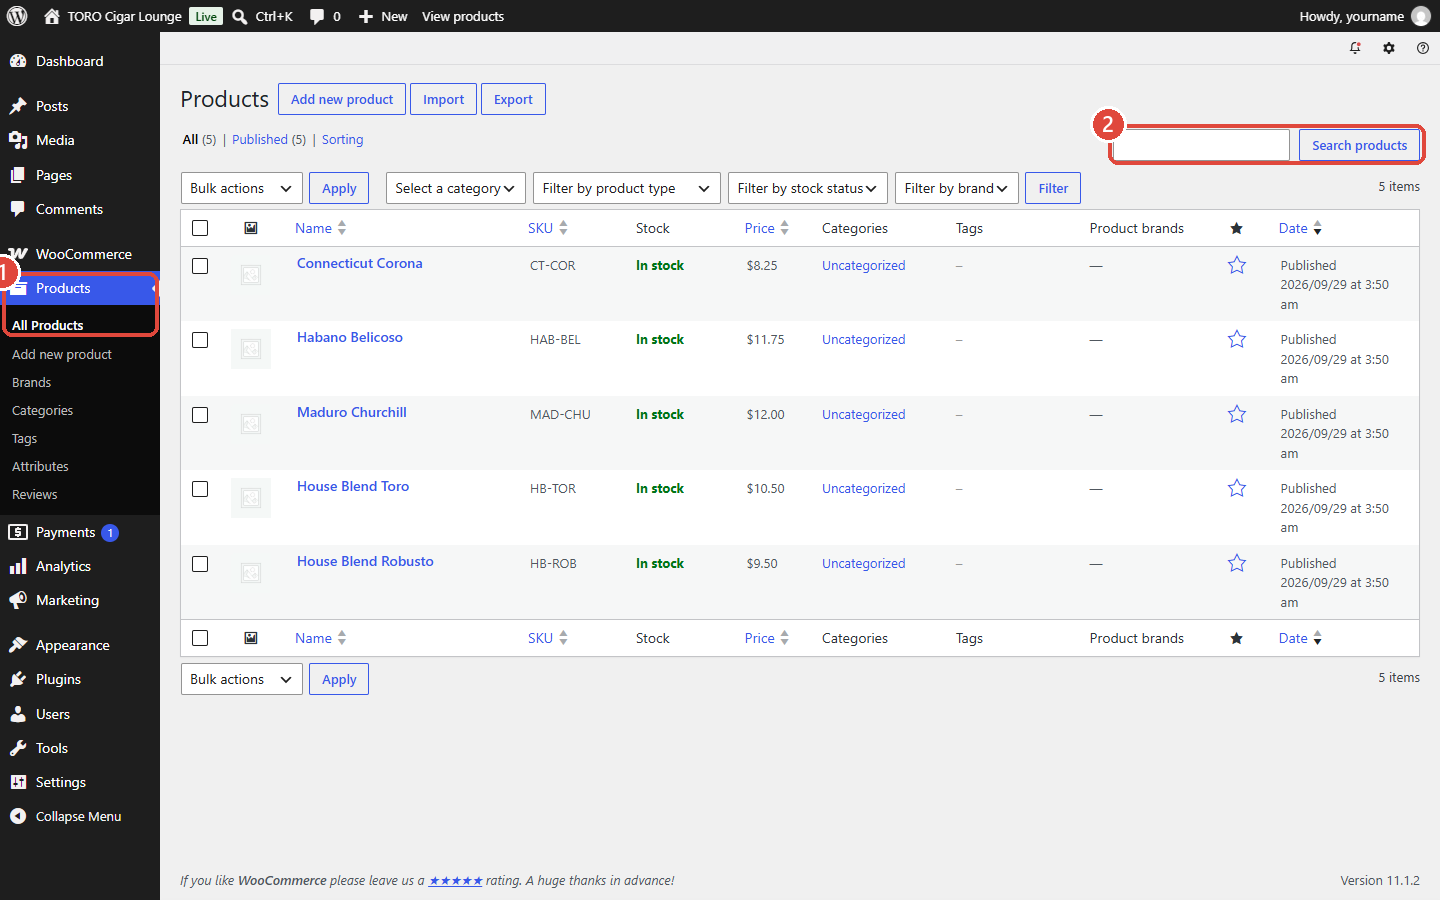
Open your products. In the black menu down the left side, click Products, then All Products (1). You'll see every product TORO has put on your website.
Find the product. Type its name into the search box at the top right of the list and click Search products (2).
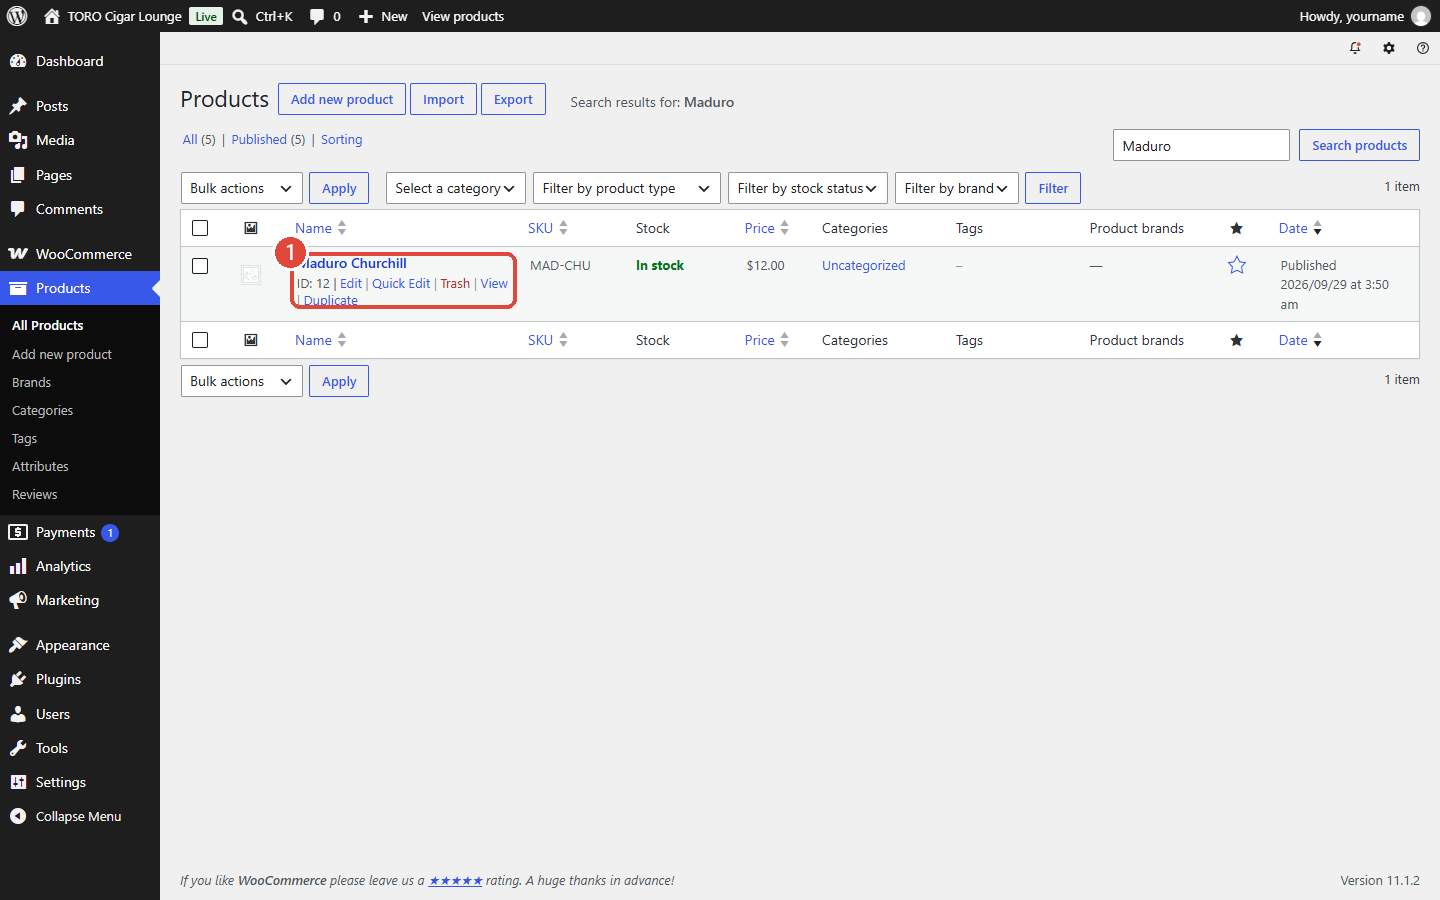
Open it. Hover over the product's name and click Edit (1), or just click the name. The product editing screen opens.
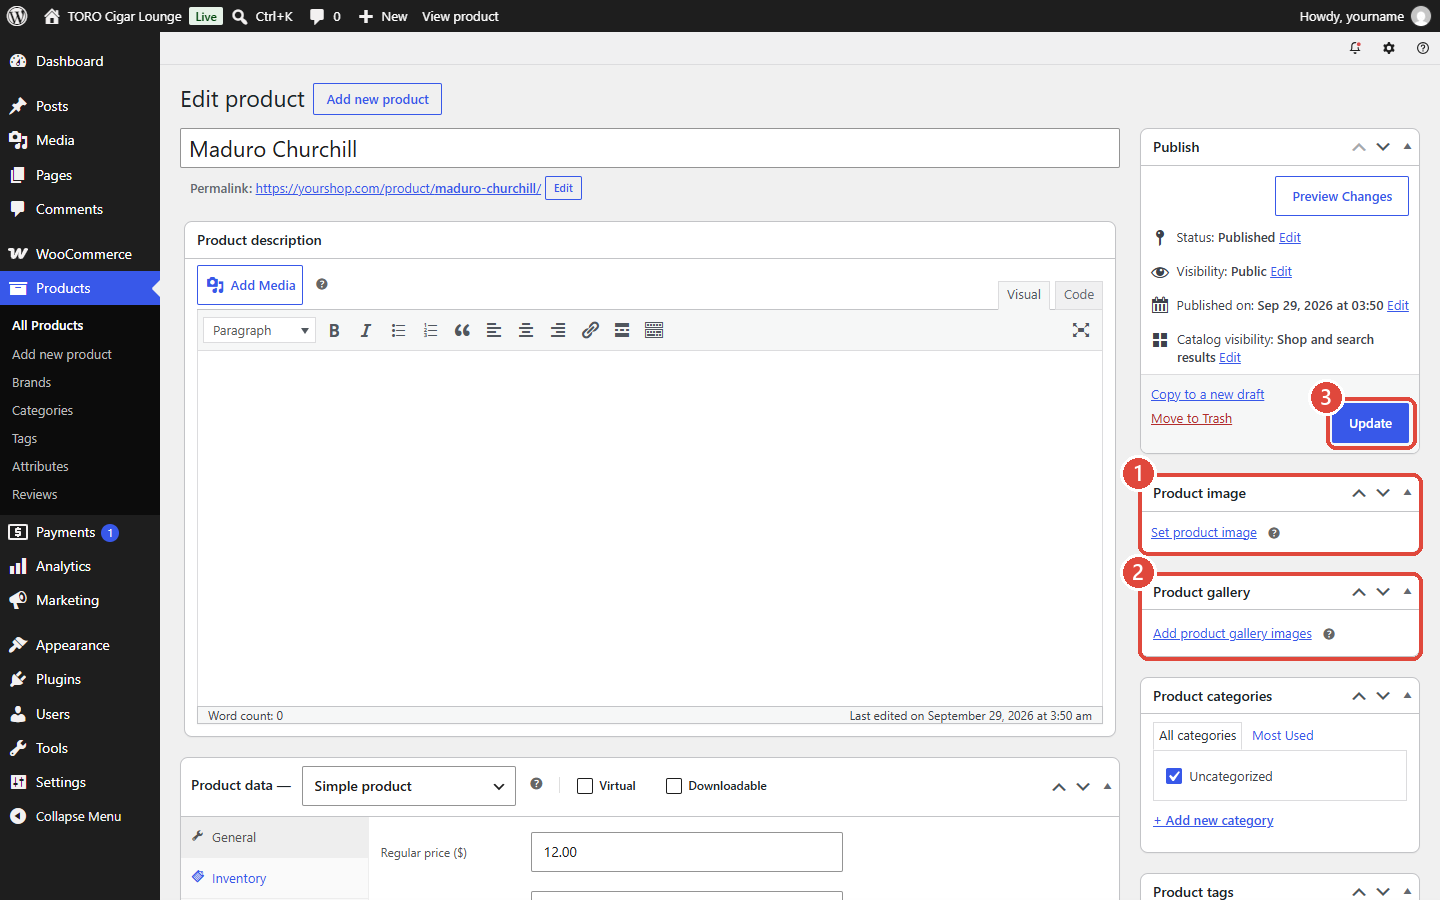
Set the main picture. On the right side of the screen, find the Product image box (1) and click Set product image. This is the photo shoppers see first and in your shop's product lists.
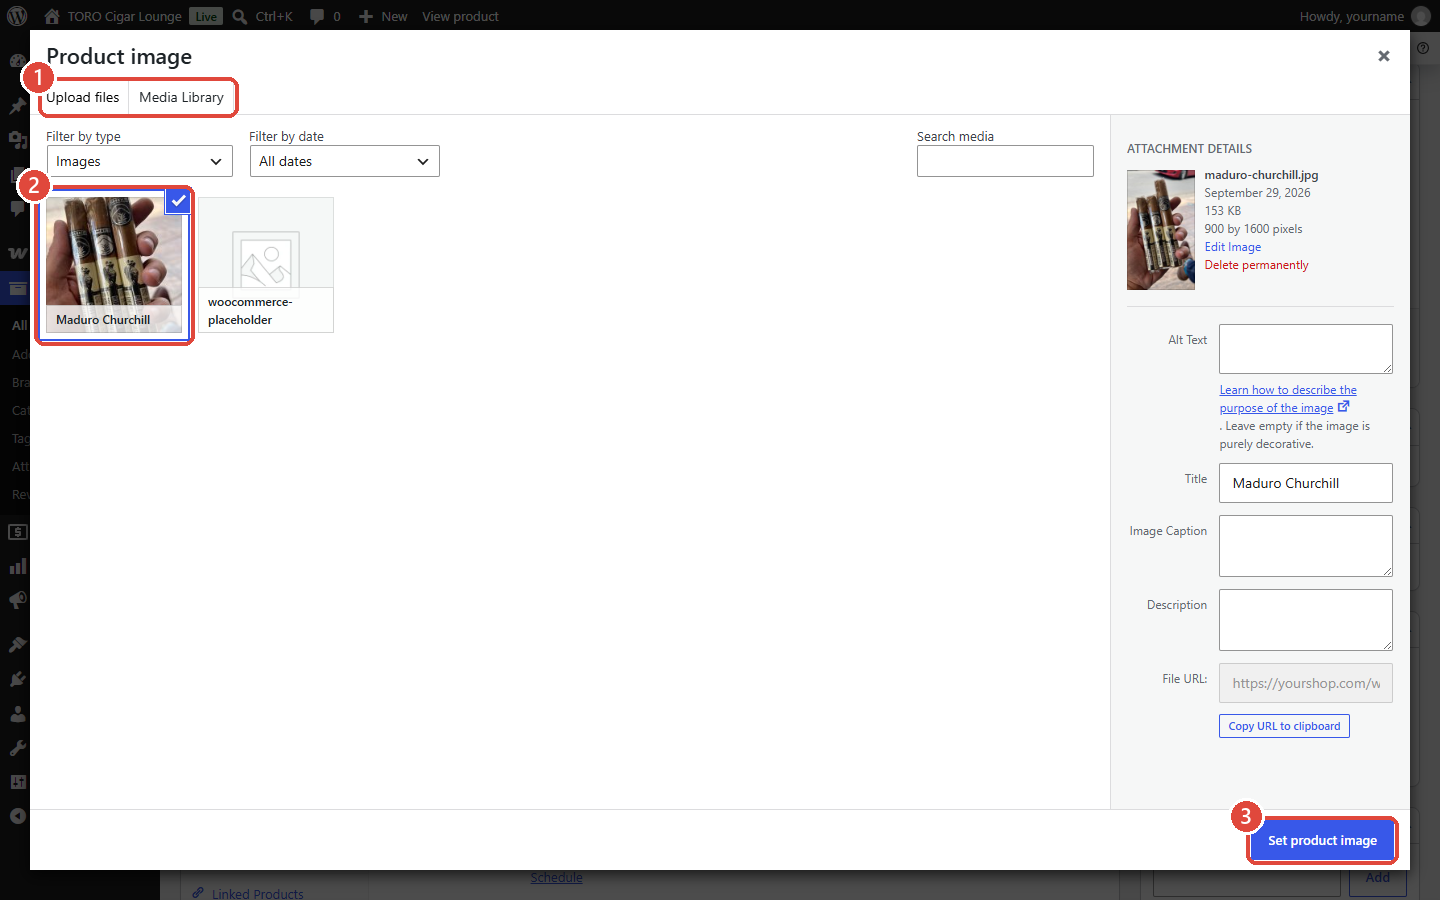
Choose the picture. A window opens. Use Upload files to add a new picture from your computer, or Media Library to pick one already on your site (1). Click the picture (2) so it has a blue tick, then click Set product image at the bottom right (3).
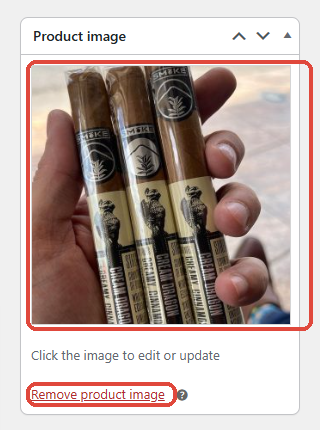
The picture now shows in the Product image box.
Add more pictures (optional). In the Product gallery box just below (2 in the Edit product screenshot), click Add product gallery images, choose one or more pictures, and click Add to gallery. These show as extra photos on the product's page. Drag them to change their order.
Save. Click the blue Update button near the top right (3 in the Edit product screenshot). Nothing changes on your website until you do.
To change a picture later, open the product the same way and click Remove product image (or the x on a gallery picture), then add the new one and click Update.
Can't get into WordPress, or don't see a Products menu? You may not be signed in as an administrator, or someone else built and runs your website. Ask them for a login, or send them these steps.
Which Should I Pick?
| TORO handles pictures | Website handles pictures | |
|---|---|---|
| Where you add photos | In TORO, on the item | In WordPress, on the product |
| Pictures added in WordPress | Removed on the next product sync | Kept |
| Item with no picture in TORO | Shows no picture online | Whatever the website has stays |
| Best for | Shops that run everything from TORO | Shops with a web person who already manages photos |
If nobody is managing photos on the website today, leave TORO in charge. It keeps everything in one place, and a new product goes online with its picture already attached.
Switching From One to the Other
The order matters here. Doing it backwards can wipe pictures off your website.
Moving pictures to the website (turning TORO's handling off): untick Use TORO to upload images first (see Step 1 above), then start adding or changing pictures in WordPress. Pictures TORO already uploaded stay on the website; you're simply taking over from here.
Moving pictures to TORO (turning TORO's handling on): load the pictures into TORO first, using Find Items without Pictures to catch every item. Tick the box only once that's done. The moment it's on, the next sync of any item without a TORO picture clears that product's pictures on the website.
Not sure which way your store is set? Open any item's Item Details, click Online Store Details, then Online Store Pictures. If it opens the Website Images window, TORO is in charge. If it tells you the website is managing its own images, the website is.
Things Worth Knowing
- It's one setting per website. If you have more than one website connected, each has its own Use TORO to upload images box. It can't be set item by item.
- Brand and category pictures aren't sent to the website. A brand's picture in TORO is for the brand buttons on your register. Set category pictures in WordPress.
- Variation pictures are always left to the website. If a product has variations (say, single and box), any pictures on those variations are managed in WordPress whichever option you choose.
- Turning a picture off in TORO doesn't delete the file from WordPress. It disappears from the product, but the file stays in your website's Media Library. Clear out the library now and then if you swap photos often.
- Good photos sell. Online, the photo is all a customer has to go on. See Your Online Store for tips.