Finding a Past Transaction
Every sale TORO rings up is saved, whether a receipt printed or not. When a customer comes back for a copy of their receipt, when the drawer is off and you want to see what went through, or when a sale needs a correction, you look it up in the Transaction List. From there you can open any sale in the View Transaction window to reprint it, email it, void it, or fix a detail.
Finding It
Open the Dashboard
Click the Transactions tab on the left, then click the View Transactions card. (Can't find it? Type "transactions" in the search box at the top right.)
You can also open it from the register: in the sidebar, open the Transactions menu and choose View Transactions.
The Transaction List
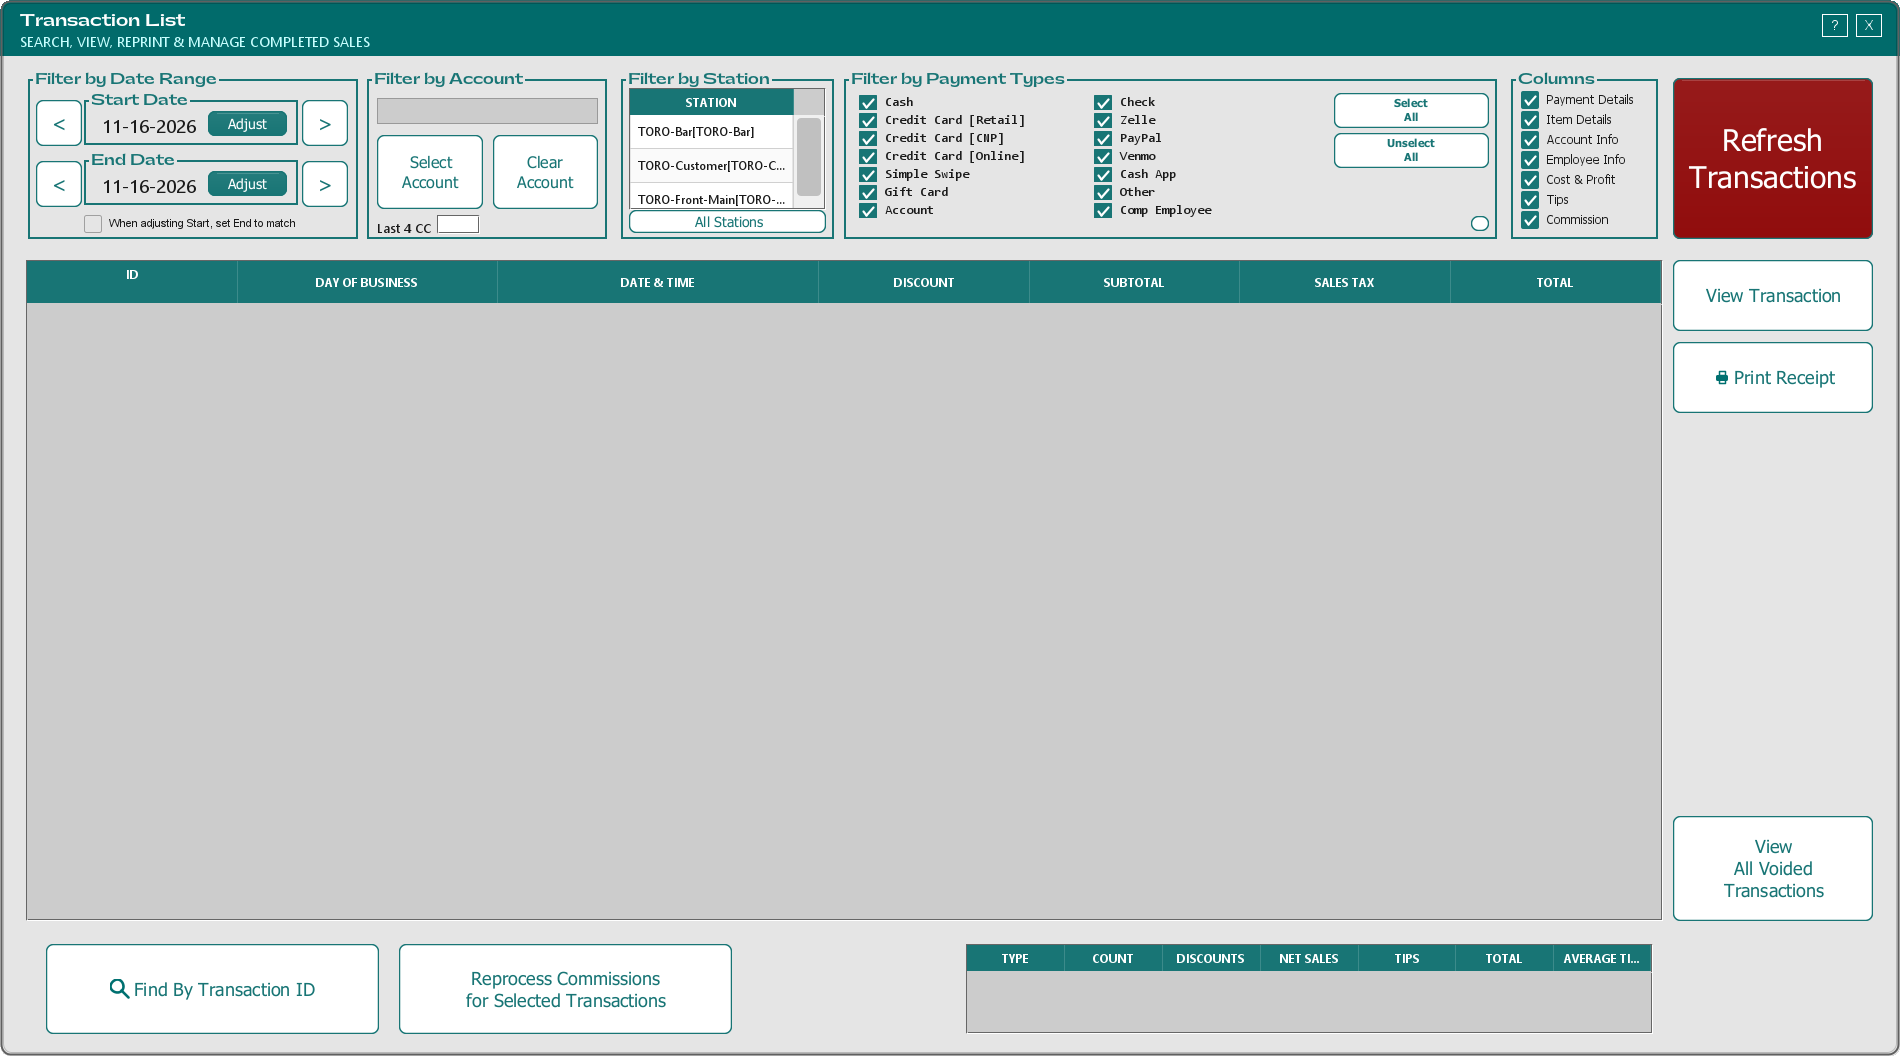
The list starts empty. The window opens set to today, but nothing loads until you ask for it. Set your filters, then press the big Refresh Transactions button at the top right. Whenever you change a filter afterwards, that button turns red to remind you the list hasn't been reloaded yet. Press it again to apply the change.
The filters
Filter by Date Range. Click Adjust to pick a Start Date or End Date, or use the <** and **> buttons to step back or forward one day. With When adjusting Start, set End to match ticked, changing the start date moves the end date to the same day, which makes looking at one day at a time quick.
Filter by Account. Select Account opens the customer finder, so you only see that customer's sales. Clear Account removes the filter. Underneath, Last 4 CC finds sales paid with a card ending in those four digits. Type all four digits; anything shorter is ignored.
Filter by Station. Click a register to see only its sales. All Stations clears the selection and shows every register.
Filter by Payment Types. Untick a payment type to leave out sales paid that way. Select All and Unselect All tick or untick the whole list. After you refresh with Payment Details turned on, each payment type shows its total for the sales in the list.
Columns. Choose what the table shows: Payment Details, Item Details (item count and a description of what was sold), Account Info, Employee Info, Cost & Profit, Tips and Commission. TORO remembers your choices for your login. Tips needs Payment Details on.
Reading the list
Each row is one sale, with its ID, day of business, date and time, discount, subtotal, sales tax and total, plus whichever extra columns you turned on. Click a column heading to sort by it.
The small table along the bottom adds things up. The All row totals every sale in the list: the count, discounts, net sales, tips, total and average ticket. Select one or more rows and a Selected row appears with the same totals for just those sales.
Some employees see only recent sales. If an employee's Transaction Viewer - Max Days of History Viewing setting is limited, the start date won't go earlier than that, and TORO tells them why. Some employees don't see the date range at all and only get today. See Employee Settings.
The buttons
View Transaction opens the selected sale. Double-clicking a row does the same.
Print Receipt reprints the selected sale's receipt.
View Voided Transactions For Date Range appears after you refresh, with the number of voided sales in your dates. If there are none it reads No Voided Transactions For Date Range and can't be pressed.
View All Voided Transactions opens the voided sales from the past year. See Looking at Voided Sales below.
Find By Transaction ID asks "What is the transaction number?" and opens that sale straight away, whatever dates are showing. If no sale has that number, TORO says "Could not find transaction #" followed by the number.
Reprocess Commissions for Selected Transactions (admins only) works out the commission again for the selected sales, after you confirm.
Finding One Sale Fast
If you have the transaction number, for example from a receipt, you don't need the list at all. On the Dashboard's Transactions tab, click the Find Transaction By ID card, type the number, and the sale opens. Voided sales open this way too.
Reprinting a Receipt
There are three ways, depending on which sale you need.
The last sale. In the sidebar, open the Transactions menu and choose Reprint Last Receipt. It prints the most recent completed sale in the store, straight away. If you have more than one register, that may be a sale rung up on another register, so check the receipt. If the store has no completed sales yet, TORO says "Must complete one transaction to be able to print a test receipt."
Any sale from the list. Select it in the Transaction List and press Print Receipt.
From the sale itself. Open it in View Transaction and press Receipt, or Gift Receipt for a copy without prices.
If your store has Tip Receipt: Totals Only turned on, a reprint (other than a gift receipt) asks whether you want the Full Receipt or the Tip Receipt. If an item on the sale has a serial number, TORO asks whether to print the serial numbers too. For a full receipt, TORO also asks whether to print a signature line. See Setting Up Your Receipt.
The View Transaction Window
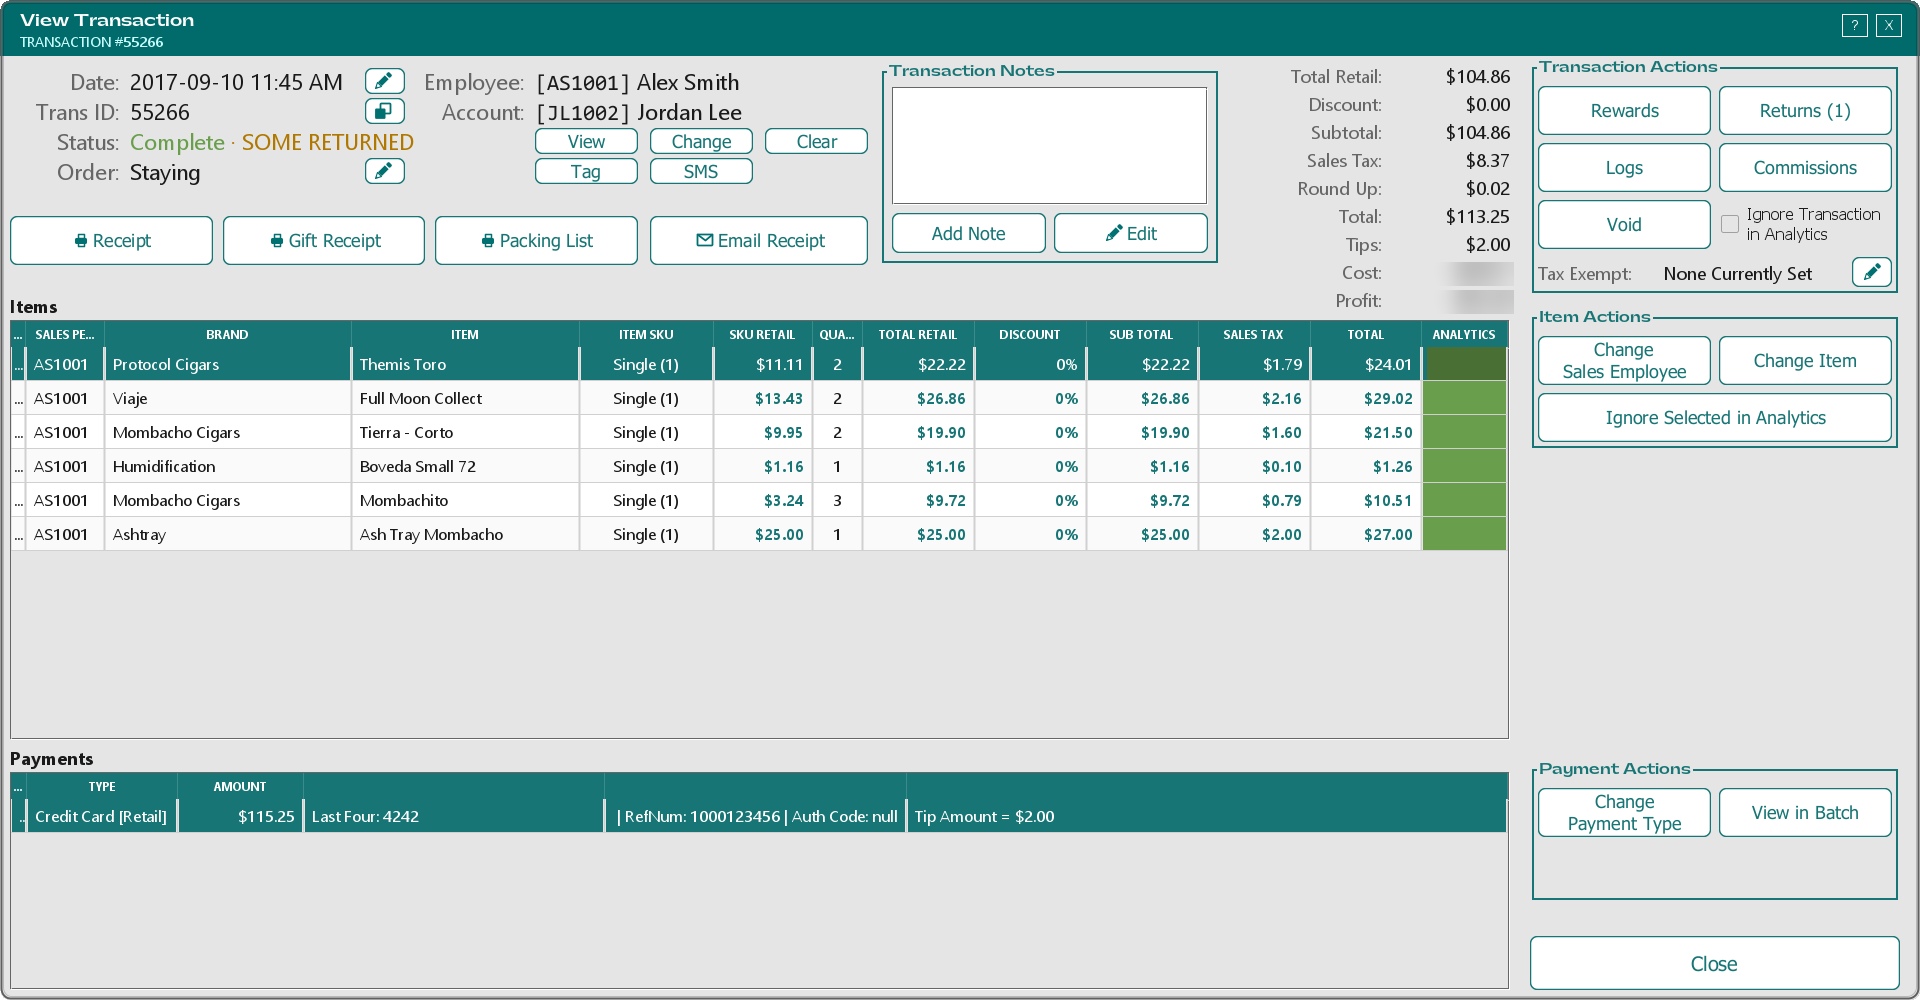
The window's header shows the transaction number. Across the top left:
Date is when the sale was rung up. The pencil button beside it changes the date and time the sale is recorded under, which moves it to that business day in your reports. TORO first asks for the PIN of someone allowed to change a sale's date (until you give that permission to an access level, only an admin can), and says Manager Access Required if nobody with it signs in. TORO adds a note to the sale saying the date was changed.
Trans ID is the transaction number. The copy button beside it puts the number on the clipboard.
Status reads Complete in green or Voided in red. If some items have been returned, it adds SOME RETURNED.
Order shows Staying or Take Out, and the pencil changes it. This line only appears if your store asks that question at checkout.
Employee is who rang the sale up, and Account is the customer on it. View opens their account, Change puts a different customer on the sale (TORO asks you to confirm first), Clear takes the customer off, Tag adds account tags to that customer, and SMS opens a text message to them if your store has texting. On a sale with no customer, a single Set Account button attaches one.
Under those are Receipt, Gift Receipt, Packing List (a list of the items with no prices) and Email Receipt.
Transaction Notes holds notes about the sale. Use Add Note or Edit; they're saved on the sale.
The totals at the top right show Total Retail, Discount, Subtotal, Sales Tax, your store's rounding line, Total and Tips. People with access to cost and profit also see Cost and Profit.
Below are the Items on the sale and the Payments that paid for it. Double-click an item to open it in Item Details.
Transaction Actions
Rewards shows the points this sale earned or used and how they were worked out. See Managing Customer Rewards.
Returns lists any returns already made on the sale and starts a new one. When items have come back it reads Returns (1), Returns (2) and so on. See Giving a Refund.
Logs opens the sale's trace, the step-by-step record of how it was rung up. If there isn't one, TORO says "No trace information is available." See Transaction Trace Logs.
Commissions opens View Commission Breakdown, the commission each line earned. See Setting Up Commissions.
Void cancels the whole sale. See Voiding a Sale below.
Ignore Transaction in Analytics. Tick it when a sale was a one-time purchase you don't expect again, such as one big order. Analytic purchase orders then won't count anything on it as sold. Inventory and your reports aren't affected. It saves as soon as you tick it.
Tax Exempt shows the sale's tax-exempt details, if any, and the pencil edits them.
Item Actions
Select one or more lines in the Items table first.
Change Sales Employee changes who gets credit for the selected lines.
Change Item swaps the selected line for a different item or packaging when the wrong one was rung up. TORO asks which item, which SKU, and how many. If the number of items changes, it shows you the old and new quantities to confirm. It changes the record of what was sold; it doesn't touch the payments.
Ignore Selected in Analytics works like the tick-box above but just for the selected lines. Lines that are ignored show red in the Analytics column. Select ignored lines and the button reads Count Selected in Analytics to count them again.
Payment Actions
Change Payment Type changes how one payment was made, for example a sale rung up as cash that was really paid by check. Select the payment first; the button only works for logins allowed to change payments. The new payment has to be for exactly the same amount. For a card payment, TORO voids the card charge with your processor (after asking twice, because it can't be undone), so it only works while the charge hasn't settled yet. Once it has settled, TORO tells you to do a refund instead. A sale that already has a return can't have its payments changed.
View in Batch opens the card payment at your card processor's website.
Add Transaction ID (the button includes your processor's name) and Change Last 4 appear only for a card payment that TORO has no processor reference for, usually one keyed in somewhere else. Add Transaction ID asks for the charge's ID from your processor and links the payment to it, as long as the amount and last four match, so it can later be voided or changed. Change Last 4 corrects the card's last four digits.
Voiding a Sale
A void cancels a whole sale. Card payments are voided with your card processor, and the sale moves out of your sales and into your voided sales. Use it for a sale from today that shouldn't have happened, such as a double ring-up or a customer who changed their mind before leaving.
Open the sale in View Transaction
Press Void, then YES to confirm
Enter the PIN of someone allowed to void sales. If nobody with that permission signs in, TORO says Manager Access Required and nothing is voided
Type the reason when TORO asks "What is the reason for this void?" A reason is required.
TORO voids any card payments with your card processor first, then marks the sale Voided and says Transaction Voided! This can't be undone.
If a card payment can't be voided, for example because this register isn't set up for your card terminal, TORO doesn't void the sale and shows an error, and the customer's card charge stays as it was. A sale paid with more than one card is the exception to watch for: if the processor voids the first card but refuses the next one, TORO stops, leaves the sale un-voided, and lists the card payments that were already voided. Don't press Void on that sale again. Call TORO Support to finish it.
TORO won't void a sale in two cases, and tells you why when you press Void:
It's from a past day. That day's drawer and reports are already closed. Use Returns instead, which gives the money back today.
It already has a return on it. Voiding would give the returned items' money back a second time. Use Returns to give back more.
After you sign in, TORO also stops the void if a card payment on the sale has no processor transaction ID (usually a card keyed in somewhere else; add it with Add Transaction ID first), or if the sale sold a gift card that has already been used.
Looking at Voided Sales
Voided sales don't appear in the main list. To see them:
Press View Voided Transactions For Date Range after a refresh to see the voided sales for the dates you picked.
Press View All Voided Transactions to see the past year.
Any range longer than a week makes TORO ask first ("Are you super duper sure?"), because a long range can take a while to load.
The Voided Transactions window has its own Start Date and End Date. Changing either reloads the list. Select a sale and press View Transaction to see it, including a Void Details box with when it was voided, who voided it and the reason. Reprint Receipt prints its receipt.
Emailing a Customer Their Recent Sales
When you open the Transaction List from a customer's account (their account window's Transactions button), it starts filtered to that customer's sales from the last month and shows an extra Email Transactions button.
Email Transactions sends that customer's sales from the last 60 days, whatever dates the list is showing, along with any balance they owe for items held on their account. Tick who should get it:
Send email to the customer, at the email address on their account (ticked to start with)
Send email to your own address. This one actually sends a copy to every admin on the store.
Send email to another address, which you type in the box beside it
Click OK to send.
Untick Send text message before you click OK. It starts out ticked, but texting isn't available from this window: with it ticked, TORO shows an error saying it "Can not notify via text yet", even though the emails still go out.